Monday, August 29, 2011

A Fresh Week, A Fresh Outlook, and My Mini C-Cups

 First I would like to wish everyone on the Eastern Seaboard of North America all the best and I hope everyone is safe and sound after Irene passed through.  My thoughts are with you all.

The Little Kitchen is soooooo ready for a new week to start, even if it is my last week of holidays!  I am going to be honest with you: I am glad this week is officially over.  Things can only really get better from here.  We are a little lost with out the BBQ at our disposal.  You never realize how much you use an item until some jerk steals it from  your back yard.  We are also adjusting to life as a one cat house after the heartbreaking passing of our beloved Daisy.  Daisy was the first family pet we got when we moved into our current house 10 years ago.  We didn't choose her, she chose the boy.  We had heard through the grapevine the local animal hospital had a litter of cats dropped off for them to adopt out.  The Boy and I stopped by to visit them and "think about getting a cat".  Well let me tell you, the vet's assistant brought Daisy into the room and put this sweet, midnight black kitty on the table.  Daisy walked over to the boy, put her head on his shoulder and started purring....she had found her human.
I used to wonder why nothing ever grew in that pot, it was Daisy's nap spot!

Needless to say, we took her home with us that night and from then on, she was the Boy's protector.  Standing in between us if he was in trouble, scratching at his bedroom door to be let in, and cozying up to him while he read.

This was a tough week and I know that in the grand scheme of things we have had tougher weeks. We will get through.  We always do.  The summer really has been a great summer so we are doing our darnedest to not let last week keep us down!

Friday morning helped, I got an email telling me I place 3rd in Canadian Beef's 'Who Rues the Grill' contest for my Chipotle lime Flank steak!! Yay!!  Of course now I wish my BBQ hadn't been stolen...ACK!

Zombie head and mini cupcakes cheer me up!
One of the ways I relieve stress is to bake.  With all the zucchini coming out of the garden, I can't help but keep making Chocolate Zucchini cake!  This time I changed it up a bit and added some coconut!  I don't mind telling you that I needed a moment alone with these cupcakes....they were just that good!


Chocolate Zucchini Coconut Cake
1/2 cup butter, room temperature
1/2 cup oil  (you can also use all butter if you wish, omit oil and use ¾ cup butter in total)
1 3/4 cup sugar
2 eggs
1 tsp coconut extract (1 ½ tsp, or 2 if you like it more coco nutty flavor)
1/2 cup buttermilk (or 1/2 cup milk soured with 1 1/2 tsp lemon juice)
2 1/2 cups flour
1 tsp baking soda
1 tsp salt
1/4 cup cocoa powder
2 cups zucchini, grated (or shredded)
1 cup cup chocolate chips (optional, but why would you leave those out?)
1 cup shredded sweetened coconut

Pre heat oven to 350F

In a bowl and set aside until ready to use, sift together the flour, cocoa, baking soda, and salt. 

In the bowl of your stand mixer (or a bowl and a hand mixer, or in a bowl with a wooden spoon and some elbow grease....) cream together the butter, oil, and sugar until light and fluffy.

Add the eggs, one at a time until mixed in.  Mix in the coconut extract and buttermilk.  Keep the mixer going for a few minutes on medium low until the mixture is a nice pale yellowish colour.

Now find the bowl you set aside with the dry ingredients and add it all to the mixing bowl.  Mix until well combined. 

Add in the zucchini, coconut, and the chocolate chips, and once again mix to combine.

Now scoop the batter into a pan that has been greased and floured or muffin tins with liners.

Bake minicupcakes for 15 to 17 minutes or until a toothpick inserted comes out clean.

Zombie cupcakes make good eats and make us laugh!

Coconut Frosting

4 tbsp softened butter
4 cups icing sugar
2 tsp coconut extract
enough water to make icing the right consistency (about 4 tbsp or so)

Cream butter with extract and sugar.  Add the water 1 tbsp at a time until icing reaches the desired consitency.  Thinner for dipping, slightly thicker for piping.

Until next time, stay warm and eat well!

Wednesday, August 24, 2011

Unbelievable

Last night, while we slept, some jerk stole my beloved BBQ from my backyard!!! GRRRRRRR!!!  Whatever am I going to do now?

Until next time, stay warm, eat well, and tie your things down!

Monday, August 22, 2011

I Can't Believe We Ate The Whole Thing Peach Pie

 
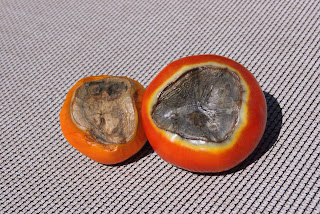
Disappointments happen all the time. One minute you think you have a gorgeous crop of tomatoes.


Then you take a closer look and find this.


Bottom rot!! ARRRRRGGGGGG!  At least we can still use the top part of the tomatoes....SIGH

Have you ever had one of the weekends that was just one disappointment after another? We just had one of those weekends that just spilled out onto Monday.  Nothing seemed to go right.  The Boy didn't make the baseball team he tried out for, we came back early from the Little Cabin due to a malfunctioning water pump, the car needs a bunch of work and we have a sick cat to top it off. 

Oh, and Canada lost a wonderful man today, NDP leader Jack Layton passed away in the wee hours of the morning.  It is a sad day for our nation. You can read Mr. Layton's last letter to Canadians here.  He always had a way with words. 

Needless to say, we are feeling a bit down.  How to cheer ourselves up???  Well, a movie with lots of explosions and shooting helps....you know what else helps??

Bacon.  Bacon always helps.  We made BLT sammies for lunch today....let me tell you, they hit the spot!!


The Boy even made some scrambled eggs to go with the sammies!


Now, my whole weekend wasn't a complete bust.  On Sunday I baked a pie! I don't bake pies too often and I am always nervous about how the crust will turn out.  This pie turned out absolutely fabulous!!! How fabulous you ask? Four of us ate the entire pie....the boy had 3 pieces....after a full on steak dinner.....need I say more?

On The Fly Peach and Strawberry Pie
Printable recipe

For the pastry:
4 cups flour
1 tsp kosher salt
¼ cup sugar
1 ½ cups butter
1 cup ice water (you most likely won’t need the entire cup)

For the filling:
5 -6 peaches
1 cup sliced strawberries
1/2 cup sugar
2 tbsp corn starch
squeeze of lemon juice

1 egg, beaten to brush the pastry

Put butter and water in the freezer to chill

Mix the flour, salt, sugar together in a bowl

Grate frozen butter with cheese grater to get lots of small bits of butter to mix in with the flour.  It should resemble coarse crumbs.


Pour ½ cup of ice water into the butter flour mixture and mix quickly to keep from warming the dough.  Add more water 1 tbsp at a time until the dough comes together when squeezed. 


You don’t want the dough wet...kind of like a biscuit or scone dough.  Tip the entire mass of doughy crumbles onto the counter.  Fold the mass over onto itself, pressing flat each time and turning.  You will quickly see the dough come together and see the layers of flakey goodness you are creating. 


Divide the dough into 4 equal portions.  This will give you 4 single crusts or 2 double crust pies.  Wrap and freeze the dough you won’t use for another time and wrap and chill the dough you are using for a good ½ hour.

Cut an x on the bottom of the peaches just through the skin.


plunge the peaches into boiling water for 1 minute then plunge them into ice water.  Using a paring knife and starting at the x incision, peel the skin off the peaches.  


Slice into the peaches around the pit, twist to remove the peaches from the pits and slice the peaches.
Toss peaches with ½ cup of sugar, 2 tbsp cornstarch, and a squeeze of lemon....add sliced strawberries.
Roll out one pie crust and line the pie plate.  Brush the bottom crust with beaten egg. (This keeps the bottom crust from getting soggy).  Tip in the peach/strawberry filling.


Roll out the top crust.  You can cut the crust into strips to make a lattice top if you’d like.  

Add some spots of butter to the top of the fruit.
 Cut the edges down, crimp the edges, and brush with beaten egg.


Bake in a pre heated 425F oven for 10 minutes.  Reduce heat to 350F Bake for 30 to 40 minutes more.  If the edges get over brown, cover with tin foil and continue to bake until done.


Allow to cool to warm before serving and make sure to serve with vanilla ice cream or vanilla frozen yogurt!


Seriously, this was so tasty, I am making it again for a dinner guest this week! 


Until next time, stay warm and eat well.

Tuesday, August 16, 2011

Peanut Butter Pie For Mikey

All week I have been seeing lovely posts and photos of this fabulous peanut butter pie.  These posts all have significant meaning.  They are in support of Jennie from In Jennie's Kitchen, her daughters, and the memory of her husband Mikey.  Jennie and the girls lost Mikey so suddenly last week to a heart attack.  Such tragedy to a young family is heartbreaking. It genuinely makes you want to hold the ones you love close and never let go.  Bloggers across the Internet have shown their support by making this pie, it is about time I did the same. Better late than never.  My heart goes out to Jennie and her girls.  I have never met them in person but I empathize and think about how I would react if I were in the same situation.  I have no idea how I would react, it is just too scary a thought...I adore that Jennie asked everyone to make this pie in his memory and spend time with our loved ones. She made us all stop and enjoy each other's company, thank you Jennie.  My thoughts are with you.


Tonight we had Hubby's father over for dinner so for dessert I decided to make Mikey's peanut butter pie.  Mmmm! Now I know why it was his favourite!  Father in law didn't stay for dessert but my dad popped by so we brought it out and shared the pie.  It is divine. 

Mikey's Creamy Peanut Butter Pie
Printable recipe
Serves 10 to 12
8 ounces chocolate cookies (or the equivalent in cookie crumbs...I like to buy the cookies already crumbed.)
4 tablespoons butter, melted
4 ounces finely chopped chocolate or semi-sweet chocolate chips
1/4 cup chopped peanuts
1 cup heavy cream
8 ounces cream cheese
1 cup creamy-style peanut butter
1 cup confectioner's sugar
1 – 14 ounce can sweetened condensed milk
1 teaspoon vanilla extract
1 teaspoon freshly squeezed lemon juice

  • Add the cookies to the bowl of a food processor and pulse into fine crumbs.  
  • Combine melted butter and cookie crumbs in a small bowl, and stir with a fork to mix well.  
  • Press mixture into the bottom and 1-inch up the sides of a 9-inch spring form pan. (I like using the bottom of a measuring cup to get clean corners)
  • Melt the chocolate in a double boiler or in the microwave.  
  • Pour over bottom of cookie crust and spread to the edges.  
  • Sprinkle chopped peanuts over the melted chocolate and put the crust in the refrigerator while you prepare the filling.
  • Beat the cream using a stand mixer or hand mixer until stiff peaks form. Set aside in the fridge for later. 
  • Put the softened cream cheese and peanut butter in a bowl.  Beat on medium until light and fluffy. 
  • Reduce speed to low and gradually beat in the confectioner's sugar.  
  • Dump in the sweetened condensed milk, vanilla extract and lemon juice. Mix on medium until all the ingredients are combined and filling is smooth. Scrape the sides of the bowl as necessary.
  • Stir in 1/3 of the whipped cream into the filling mixture (helps lighten the batter, making it easier to fold in the remaining whipped cream)
  • Fold in the remaining whipped cream.  Pour the filling on to the crust.  
  • Allow to chill in the fridge for at least 3 hours before serving.
  • I like to cut up some peanut butter cups to toss on top with a drizzle of chocolate!

Until next time, stay warm and eat well!

Monday, August 15, 2011

Little Cabin in The Woods - Bannock

Ahhhh, my happy place....the little cabin in the woods....truly peaceful, calm, relaxing....especially when the water looks like this:

 Perfect and calm, like glass.....the perfect day for a paddle on the lake! As a matter of fact, the Boy is waiting for me on the dock!!

"Wish my Mom would stop taking pictures and get in the canoe....."

 Things in our neck of the woods have gone from super soaked to super dry...so dry in fact that all back woods travel, cooking/bonfires, and hiking has been forbidden.  Unless you want a 450 dollar fine for committing such things, I suggest you don't.  We had a close call the other Monday (Civic Holiday Monday, August 2). The Boy and I went out on the lake for an early paddle in the new canoe.  It was while we were on the other side we heard sirens and helicopters.  These are odd sounds for the middle of the lake so we knew something was up.  Later while we were eating a late breakfast at the cabin, water bombers started swooping in low over the cabin and into the river. 

Hmmm....something strange was definitely going on.

Turns out there was a small (1/3 of a hectare) forest fire burning not too far from the Cabin near Nutimik...ACK!!!  Luckily this fire was spotted early and It got doused early.  Whew! We have had dry years and forest fire threats such as this one from 1984.
Unfortunately the travel and fire restrictions mean I couldn't use a fire to bake.  That is just fine by me, I would rather have my forest in tact!

Bake on the fire? Yes, that is what I said.  I made bannock on the BBQ that weekend but what I really wanted to do was cook it the old fashioned way: it on a stick over the fire.  Alas, that will have to wait until the fire ban is lifted.
Crsipy, banocky goodness.....still hot!!
Bannock is a traditional Aboriginal biscuit-like simple bread with Scottish origins.  You can read more about the history of bannock here, and here.  Almost like a baking powder biscuit. I baked mine on the BBQ in a cast iron skillet but I remember my camp days of wrapping a rope of dough around a stick and cooking it over an open fire. We will have to do that after some rain has fallen and the fire ban is lifted!

The recipe is simple.  Traditionally any type of fat on hand would be used such as cooking grease, lard, bacon drippings.  I stuck with butter on this one but I do know that at camp we used lard.  When the kids make bannock at school I believe they use shortening.

This proved tasty and went well with breakfast!

Bannock

4 cups flour
1 tsp salt
4 tbsp baking powder
4 tbsp butter, shortening, or lard
1-2 cups cold water (this amount varies and you may not need all the water so hold some back, add a little at a time.)

Mix all the dry ingredients in a bowl.


Add the butter. (I like to use the cheese grater to shred the butter, it helps incorporate the fat into the flour)
Cut in the butter until the mixture resembles coarse crumbs.


Add about half of the water and mix.  The dough will be slightly dry. If the dough is really dry, add some more a tablespoon or two at a time. It will still look like it won't come together, but it will. 


Turn the dough out onto the counter and fold the dough over onto itself a few times, patting it down in between each folding,...just like when making scones.  Just when you think the dough won't come together, it does!
Pat the dough into a flat disk.  If using a baking sheet, make the dough no more than 2 inches thick.

Toss onto a well oiled pan and bake at 400 for 20 to 25 minutes, or on the BBQ using indirect heat for 20 to 25 minutes.

Flip the bannock over so you can get a nice brown crust on both sides.  (You probably won't need to flip the bannock if  you are baking it in the oven)

Cut into wedges and serve!
Bannock is great served with butter, jam, honey,  good for making breakfast sammies........ best eaten warm.

While driving to the Farmers' Market, I took some photos of how smokey it got out in the Whiteshell.  Manitoba Conservation assured me the smoke was from forest fires burning in Ontario.  Yikes!


Smoke on the water........

Smoke on the road as well

Well, I am hoping for a really good rainfall, until next time, stay warm and eat well.

Sunday, August 14, 2011

Please Help Us Meet Cake Boss Buddy Valastro

Traditions can be fun, especially when they involve meeting someone you admire, or look up to, or they are a celebrity you follow.  I said follow, not stalk. There are laws you know!

Back in 2002, Trina and I met Martha Stewart. She was in town being honoured at a dinner by the Asper School of Business. We were fortunate enough to get to attend the dinner and meet the woman herself.  Why do I bring this up you ask? Well I ask because now Trina and I have the opportunity to meet Buddy Valastro, The Cake Boss himself!  We have both entered our cakes in the Bake Boss contest sponsored by Redpath Sugar on Facebook. 

You can help us out by going to the Redpath Sugar voting page and voting for our cakes! Trina and I are so hoping to continue this tradition and greatly appreciate your vote.

Since you will have to scroll through the cakes to find them, Trina's cake is the mermaid cake:


My cake is the Plants vs zombies cake:

Trina and I have been vying for votes and are now falling behind in the contest.  Please take a moment to go to the Redpath Sugar Voting page and vote for our cakes. 

Just imagine the fabulous post I can share after Trina and I meet Buddy Valastro!!

Thank you for voting!


Until next time, stay warm and eat well!

Thursday, August 11, 2011

Marvel-ous Zucchini Chocolate Cakettes

The season's first zucchini, fresh from the garden!

Bless me fellow bloggers for I have a confession to make....it wasn't a pretty sight......my Tupperware and other assorted containers got completely out of control!  I didn't know where to put them anymore.  It seems no one else knew where to put them either.  Lids and containers stood perilously on counters, fridge tops, and window sills.  The slightest of miscalculations in movements would cause a landslide of plastic container hell to come tumbling down.  It was unsightly, it was bothersome, it was not what the Little Kitchen needed.  Especially since I have been on holidays for a while....how did I let it come to this?

A small portion of the un matched and un used plastic explosion!!

 Too much time in the hammock? Too distracted by Cleo Coyle novels? Too many doctor appointments?  Who knows.  I think I have fixed it.....for now....as long as everyone else co operates...I mean there are only 3 of us in the house.  It must be the cats getting into the plastic containers messing them up and hiding lids....hmmmm.

Neatly stacked, lids stored
Lids!!!
Now that I have cleared away the clutter, it is time to de-stress with some baked goods!  These honestly made me giggle while baking...I am sure the boys assumed I was up to no good: they were right. I turned zucchini into chocolately cakey goodness.....it just so happens the cakes were in the shape of Marvel superheroes! (A special Thank you to my sister for picking these up at the Williams Sonoma when she was in Oklahoma City, OK!!!!!! According to the sales lady, it was the first day they had them and my sister snagged it up!! THANK YOU!)
Best Cake pan ever!!!
I can assure you that chocolate zucchini cake is a delectably moist and chocolately cake, you won't taste the zucchini at all, just chocolatey cakey goodness!


Chocolate Zucchini Cake
Printable version

1/2 cup butter, room temperature
1/2 cup oil
1 3/4 cup sugar
2 eggs
1 tsp vanilla
1/2 cup buttermilk (or 1/2 cup milk soured with 1 1/2 tsp lemon juice)
2 1/2 cups flour
1 tsp baking soda
1 tsp salt
1/4 cup cocoa powder
2 cups zucchini, grated (or shredded)
3/4 cup chocolate chips (optional)


Pre heat oven to 350F


In a bowl and set aside until ready to use, sift together the flour, cocoa, baking soda, and salt.

In the bowl of your stand mixer (or a bowl and a hand mixer, or in a bowl with a wooden spoon and some elbow grease....) cream together the butter, oil, and sugar until light and fluffy.


Add the eggs, one at a time until mixed in.  Mix in the vanilla and butter milk.  Keep the mixer going for a few minutes on medium low until the mixture is a nice pale yellowish colour.


Now find the bowl you set aside with the dry ingredients and add it all to the mixing bowl.  Mix until well combined.


Add in the zucchini and the chocolate chips, and once again mix to combine.


Now scoop the batter into a pan that has been greased and floured or muffin tins with liners.


This pan takes 1/2 cup of batter per form.

Make sure the batter gets into all the nooks (ears) and crannies!


Bake cupcakes for 20 to 25 minutes or until a toothpick inserted comes out clean.
With this pan, I give it a shimmy shake to make sure the cakes are loose.  After a 10 to 15 minute rest, flip them out onto a rack to cool.

Oh Thor, you are so handsome!!!
Until next time, stay warm and eat well!