Showing posts with label lime. Show all posts

Thursday, July 25, 2013

Quinoa Salad is Berry-licious!


I really have no excuse for not posting too regularly except for the fact that I have been enjoying some much needed alone time.  How is this you ask? For one, I am on holidays from work until September.  Two, Hubby has been working during the day, as per usual. Three, the Boy is on a fantastic Me to We adventure in Ecuador building a school, playing games with kids, and having a blast. (He's a keeper!)

Not to brag too much, but I have been sleeping in, watching Netflix, and hanging out in the garden.  Nothing too exciting but seems to be just what I needed.  That being said, many apologies if I haven't kept in touch. I must also admit to spending a good amount of time browsing Pinterest.  I love seeing the ideas and thing people come up with and sometimes it inspires my own thought processes.

I found some salads featuring quinoa and berries.  The dressings didn't seem to appeal to me so I figured honey and lime always go well with berries and boom....there you have it. 


Berry Quinoa Salad with Honey Lime Dressing

4 cups mixed berries 
    - I used a mixture of blueberries, cherries, raspberries, and strawberries
1/2 cup un cooked quinoa
1 cup water
Slivered almonds, toast almonds in a dry pan until slightly golden and allow to cool.

Honey lime dressing

1/4 cup lime juice
2 tbsp honey
3 tbsp oil (use a neutral tasting oil such as canola)
Pinch of salt

Combine the quinoa and water in a pot.  Bring to a boil, slap a lid on it, reduce the temperature to low and set the timer for 15 minutes.  When the timer dings, take it off the heat, fluff it with a fork and set it aside to cool.

Wash and dry the berries, cut up the strawberries, pit and halve the cherries, and put it all to the side.

Combine the dressing ingredients in a jar and shake it until everything is combined. Give the dressing a taste to see if it needs more honey, or lime, or salt.

Once the quinoa is cooled, combine it with the berries, almonds, and the dressing. Chill until serving time.

This salad was divine....Hubby gave it rave reviews!


Until next time, stay warm and eat well.

Tuesday, May 8, 2012

Ginger and Spice and Everything Nice: Homemade Ginger Syrup

Lemon lime basil with raspberries
 Way back in the dead of winter we had the amazing opportunity to travel to Hawaii and I am still day dreaming about going back.  Now that the sunshine is here and the grass is green, I am dealing with life off the island a bit better than before.  One of the tasty things we tried at the Honolulu famers' Market was a homemade ginger ale concoction from Pacifikool that was absolutely fabulous.  Ginger syrup mixed with sparkling water (or club soda) and flavoured with lime, berries, basil....I believe the boy took his cup back to that booth for a refill!

Blackberry mango lime ginger ale

Not only is ginger tasty, it also has huge health benefits if consumed regularly. Ginger is beneficial for the gastrointestinal system, motion sickness, arthritis, and it also is an antioxidant and can help boost the immune system! Those are just a few of the benefits of this spicy little rhizome! Find out some more info at these helpful websites:

World's Healthiest Foods

Health benefits of ginger

I looked up a whack of different recipes online and found pretty much the same basics: make a simple syrup infused with ginger.  A simple syrup is basically equal parts sugar and water boiled until the sugar dissolves and cooled down.

Here's what I did:

Wash then chop up a big ole rhizome of ginger into smallish pieces and place in a pot. ( To peel, or not to peel? The first time I made this, I peeled the ginger but the second time, I washed it well and chopped it up. I didn't notice a difference. This is strictly a personal preference)
Add to this pot:
  • 2 cups sugar
  • 2 cups water
Bring to a boil, slap a lid on it, reduce the heat to medium, and let it steep for about an hour.


Allow the syrup to cool before draining it and storing in the fridge. This syrup hasn't lasted more than 1 week, because we keep using it up so quickly! Every recipe seems to say something different. Some say 2 weeks, some say they've successfully kept ginger syrup for 6 weeks in the fridge.


I have been using about 3 to 4 tbsp of syrup and topping the glass up with club soda. (I also squeeze some lime into the bottom of the glass first.


Other tasty add ins we've used this week:
  • fresh basil leaves
  • raspberries
  • backberries
  • mango
  • mint
  • lime
  • lemon
 When using the add ins, make sure to muddle everything at the bottom of the glass first, then add the ginger syrup, then add the club soda. (muddle is fancy talk for 'smash things up a bit')


You can test things out and use the amount of syrup you feel tastes the best. In general I have been using 4 tbsp to 1 cup of chilled club soda (1/4 cup syrup to 1 cup soda). I have made syrup twice in the past week now and have been making different concoctions ever since!

Mango lime basil

 I really love the hint of warmth left after drinking this. I find I prefer this to the prebottled brand names becaues I can really taste the ginger.  Mix it with all those add ins and the flavour possibilities are endless!  Now I just have to play with adding the liquor and my summer is all set!

Here is a few sites I looked at while deciding in what to do with the ginger.

Joy the Baker
Cocktailia
Martha Stewart

Until next time, stay warm and eat well!


Sunday, June 26, 2011

Who Rules The Grill?

I rule the grill! Today the Boy had a double header out in Sanford Manitoba.  It was a bit of a trek but for 2 games of baseball, we don't mind.  (FYI, they won the first game but lost the second game.) This morning before we left the house, I made sure to throw together a marinade for a flank steak I had just begging to be flavoured up.  The fine people behind Canadian Beef have thrown together a great contest for Canadian bloggers called 'Who Rules The Grill?'.  The contest caught my eye on Twitter and I knew I needed to think of something.  I chose a flank steak to toss on the the grill but first I had to marinate it for a while.  As I browsed through my fridge and freezer I found some chipotle peppers and limes...hmmmm think, think think.....


Chipotle Lime Grilled Flank Steak Salad

3 (or 4) chipotle peppers, chopped
1 tbsp (or so) chipotle sauce from the peppers
zest of 1 lime
juice of half a lime
1/4 cup olive oil
pinch of salt and pepper
1 flank steak, trimmed of excess fat and connective tissue
salad dressing of your choice
Chipotle and lime: the perfect combination!
In a zip top baggie, combine the peppers, sauce, lime zest, lime juice, olive oil, and salt & pepper.  Use your hands on the outside of the bag to mix it all up.
The no mess way to mix!!
 Add the steak and once again use your hands on the outside of the bag to ensure the steak gets completely covered in chipotle lime goodness.


Place the bag in the fridge to marinate for the day or overnight.

Heat up the grill and grill your fabulous flank steak for 5 - 6 minutes a side or until medium.  Remove to a plate, cover with foil and allow the steak to rest for 5 minutes.
mmmmmmmm.......
Give your steak a 1/4 turn half way through cooking to get fabulous grill marks!
 Once rested, thinly slice the steak across the grain.

Slicing across the grain ensures a nice tender steak.
 Serve on top of your favourite salad greens with your favourite fixins' and dressing.


This really was such a perfect dinner tonight. Tasty protein, lots of veggies....oh so yummy! I think next time I will add some cheese of some sort....

Until next time, stay warm and eat well!

Thursday, June 2, 2011

Cilantro Lime Rice: Dinner on The Road

Baseball season is in full swing in the Little Kitchen and this means that at some point during each week there is a need to play away games.  I have been quite on the ball (pardon the pun) with dinners on these nights.  (*pats self on back*)  Tuesday night I even was ahead of the game (groan) and got our 'travel dinners' ready so all we I had to do was heat and go Wednesday evening!!  The boy and his team are to report to the diamond an hour before the game starts to get themselves ready.  This means he has to be there for 5:30 if the game starts at 6:30.  At times, the away games are pretty far from home and require a bit of a drive.  For home games this is no problem as we can even drop him off, come back home and then go back for game time.

A bevy of veggies
For the last couple of away games I have had a travel meal ready for Hubby and I to eat at the game.  The game plan is to assemble and store in the fridge, heat up the meals before leaving, arrive at the diamond on time for the Boy to meet the team, Hubby and I enjoy a meal together at the diamond!  You may be thinking at this time "Hey genius, why not just eat at home before you leave?" I will tell you, when leaving at 4:30 for a game, it is too early to eat.  Yet when you realize that the average ball game can easily last over 2 hours....sigh....too early to eat before we go but too long to wait for dinner.  The solution is here.  Planning and prep work are needed! The effort is so worth it and keeps us from having to stop at drive throughs and gas stations to eat.  (BTW, the Boy eats at home right after school, then again in the car, then again when we get home, then again......you get the idea!)

I even chopped up some veggies to have with hummus as a snack for the ride home.  Of course I had to pack the beautifully different coloured peppers separately so the Boy would still eat the green peppers.  Pack it all together and store in the fridge waiting to be added to the cooler.


Cilantro Lime Rice with Beans
For the rice:
  • 1 small onion, chopped (I used 1/4 of a large white onion)
  • 1 cup bell peppers, chopped (I like using a little bit of each colour, this one was green, orange, red)
  • 1 (or two) jalapeno peppers
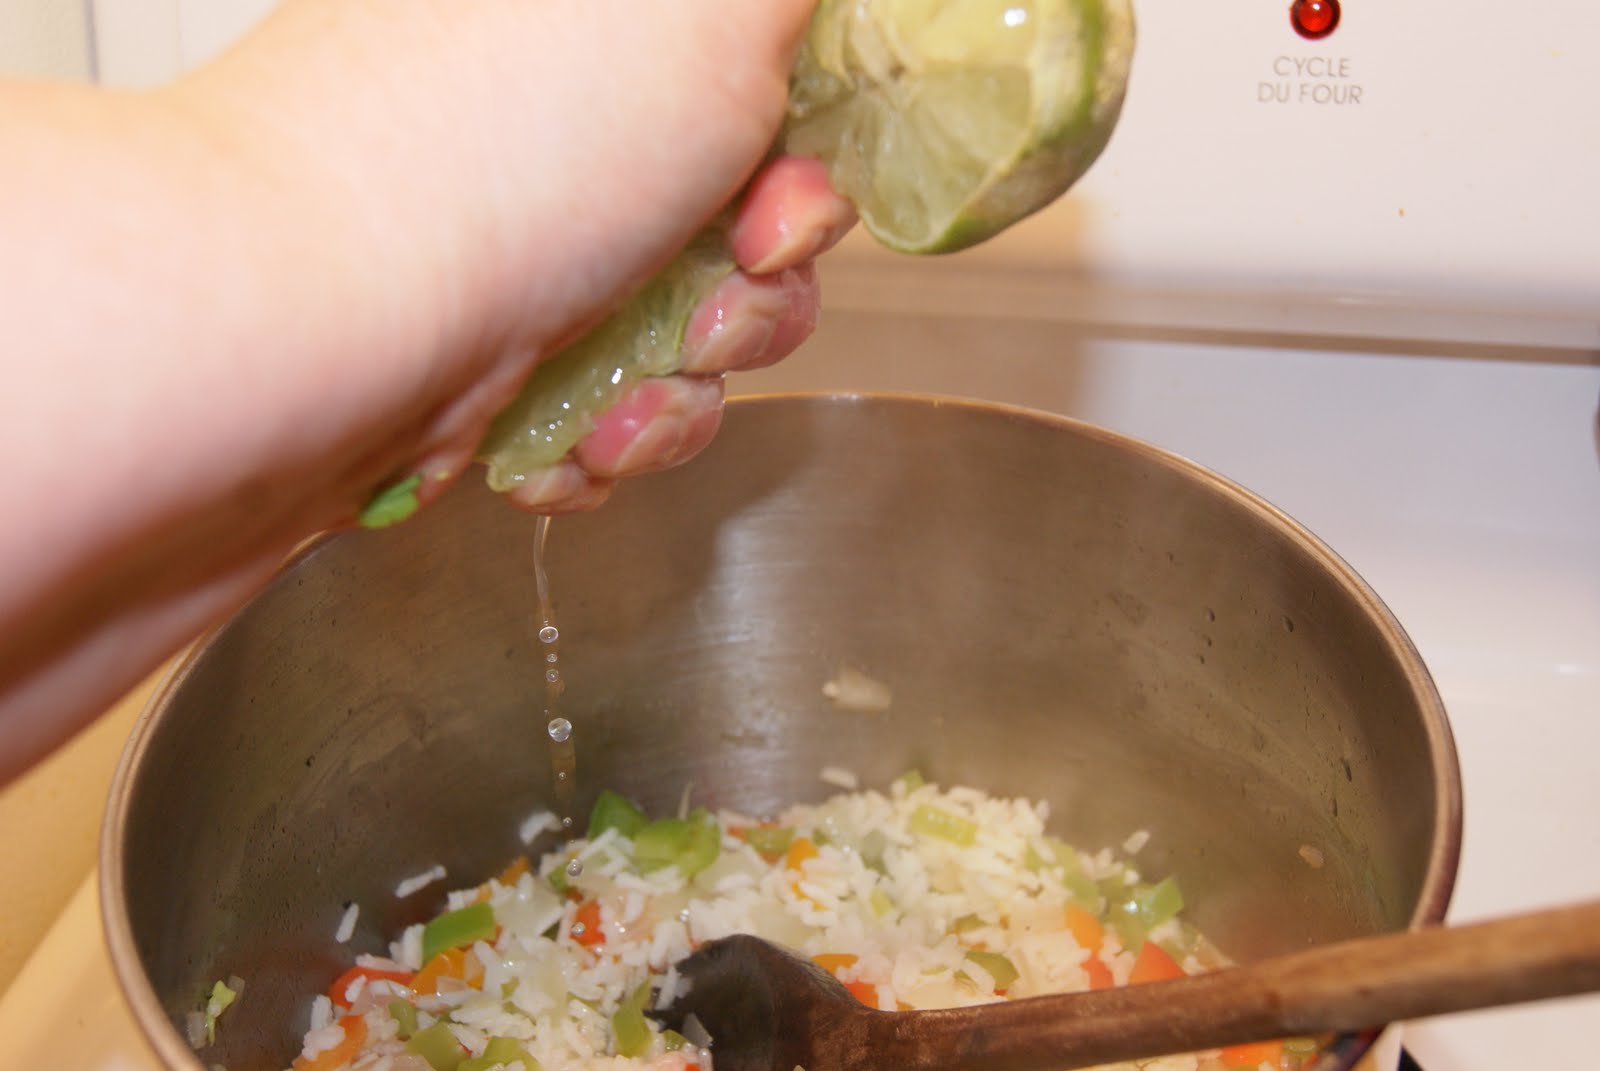
  • Zest of 1 lime
  • juice of 1 lime
  • handful of cilantro, rinsed and chopped
  • 1 tbsp olive oil (or butter, or canola oil, or whatever you want to use)
  • 1 cup rice (of your choice)
  • liquid as per rice directions (I use water but stock or broth would be tasty)
Heat a pot over medium heat and add the oil.

Saute the onion, bell pepper, and jalapeno until fragrant (NOTE: if you are using a long grain rice, don't over cook the veggies here.  They will cook with in the liquid with the rice and you don't want mushy veggies! If you are using minute rice (because your lovely Hubby did the shopping and the giant box of minute rice was on sale and that is all yo have) then cook the veggies longer as minute rice only takes, well a few minutes to cook.

Add the rice to the veggies and stir it all up.  Now add the water.  Slap on a cover and allow to cook as per any rice package directions and let the rice cook.


Squeeze the lime juice and toss in the lime zest and stir it all in.


Add the chopped cilantro, stir again and enjoy....or spoon into your travel containers.


This rice is just plain yummy.  A bit of heat, lots of lime, and a bit of cilantro...yummy!!!
The beans....now I like just plain old baked beans with this but this time I made some re fried bean type dish to go with it.  These beans were darn tasty (and a bit spicy!) but as the rice was also spicy, I opted to have plain old baked beans with my rice and Hubby had the spicy beans.

Re friedish beans
  • 1/2 small onion, diced fine
  • 1/2 tsp cumin
  • 3 or 4 chipotle peppers, chopped fine
  • 1 can navy beans, rinsed and drained
  • 1/4 to 1/2 cup water ( or stock)
  • 1 tbsp oil
Heat a pot over medium heat and add the oil.

Saute the onion until soft and stir in the cumin and the chipotle peppers.
 
Add the rinsed and drained navy beans, stir it all together.  Let the beans get heated through.


Grab a potato masher and start mashing the beans to your desired consistency.


Serve with the rice. (Or spoon into your travel container with the rice)


Once your containers are full (and everything in the container is piping hot) place the covers on, wrap in a towel and place in a bag. Add another towel if needed to help keep the food hot until eating time!

Note: When making this the night before, make sure you heat up the beans and rice hotter than you think, especially if you are wrapping this up to go.  This way it will stay warm until you eat.

Double up the towel and fold around the hot containers
Tuck a couple of drinks in the bag, some seeds, and you are ready!
Remember to wrap some cutlery in a napkin so you can eat!
 Now as luck would have it, we I packed everything up to go, we even started driving, got on the perimeter highway.  My phone buzzed with an incoming email...the game out in rural Manitoba was cancelled and they would be having a practice at the home field.  The diamond out in Sanford Manitoba is still under water....sigh.  We turned around and came home.
.
We ate our travel dinners at home, then got into the yard (and the glorious sunshine) to get some work done, the boy went to practice....sigh...

With the weather being nothing but rain and wind, (and the baseball schedule) it has been darn near impossible to tend to the lawn so it did look a little like this:


 Oops.....

Tuesday, May 10, 2011

Chasing Away the Rain with Mango Lime Cupcakes

The Boy had his first baseball game of the season scheduled for last night. Unfortunately it rained and the game was cancelled. This calls for cupcakes.  I know, I know, I just made cupcakes the other day...I was just so excited at how well the pretty pink strawberry rhubarb cupcakes turned out that I wanted to try another flavour combination....hmmm....what to do, what to do.

Last week while shopping for Cinco de Mayo, I grabbed a mango thinking I'd probably use it....I also grabbed a bunch of extra limes....hmmmm....what to do, what to do...


Mango Lime Cupcakes!!!! Oh yes I did! I used my basic vanilla cupcake recipe, you know the same one I used to make the strawberry rhubarb cupcakes and just switched out the fruit!


Mango Lime Cupcakes

3 cups flour
3 tsp baking powder
1 tsp baking soda
1/2 tsp salt
1 cup butter
1 1/2 cups sugar
4 eggs
4 tsp vanilla
1 1/2 cups buttermilk
2 cups mango (chopped fine)
zest of 1 lime (I think I will use more next time)
squeeze of lime juice
1 tbsp sugar

Pre-heat oven to 350F

Peel and finely chop the mango.  Zest the lime, making sure to get only the green.  Mix the mango, lime and lime zest with a squeeze of lime juice and 1 tbsp sugar and set aside.


In a bowl mix together 3 cups flour, 3 tsp baking powder, 1 tsp baking soda, 1/2 tsp salt and set aside.

In the bowl of a stand mixer (hand mixer or by hand will work too) cream the 1 cup butter with the 1 1/2 cups sugar until light and thoroughly mixed.

Add the eggs, 1 at a time allowing each one to mix in completely before adding the next one. Mix in the vanilla. (I suppose tequila would also go well here....)

Add the flour mix and the buttermilk, alternating additions starting and ending with the flour.

Mix in the mango/lime zest/lime juice mixture.

Scoop into lined cupcake pans to 2/3 full and bake for 15 to 20 minutes or until a toothpick inserted in the centre comes out clean.  Cool in pans for 5 minutes then remove to cooling racks to complete cooling.

I looked around (again by look I mean Internet search) for a coconut icing recipe.  I found and interesting one that was similar to a meringue butter cream but used the egg yolks instead of the egg whites...I just happened to have some egg yolks leftover from the the strawberry meringue butter cream I made the other day...perfect!

To make a long story short, I was 100% skeptical of this recipe but I gave it a go.  You know what, it is silky, rich and sooooo tasty.  I just wished I had the coconut extract it calls for but it still has a nice coco nutty flavour with a hint of lime...I did make the addition of lime zest to the recipe and sprinkled the final cupcakes with toasted coconut...yum!!
 
Find the icing recipe here


To toast coconut:

Pour the coconut in a dry pan and heat over low to medium, watching closely.  Give the pan a stir or a shimmy shake every now and then.  When the coconut starts to brown, it will finish toasting quickly.

You can also toast coconut in the oven on a baking sheet.  Just make sure to not have the oven too hot and to keep a close eye on things.

Until next time, stay dry and eat well!