Tuesday, October 12, 2010

Gobble, Gobble, again? Confessions from my freezer.

How many days in a row can we eat Thanksgiving leftovers before we shove them in the freezer and forget about them?   I am ashamed to say that my son just pulled out of the chest freezer in the basement a container of leftover turkey....by looking at the freeze driedness of the meat, I really can't say just how long that has been in there.  That is the problem with keeping things in the basement; you forget about them!
Thank goodness we only had our turkey dinner yesterday so there is fresh turkey to work with!    I have invited my sister, her husband, and my dear sweet four year old nephew over to help out! I am still anticipating leftover turkey.  The side dishes, I am not too worried about.

What to do with all of that turkey?  Sandwiches get boring pretty darn quick.  So do plates of turkey and left over sides.  Not everyone I know likes to make gigantic turkey and sides sandwiches like my fourteen year old does. 

When I got home from work today, I brought out the good old stock pot.

Into this beloved giant pot I put:
  • 1 large onion, quartered
  • 3 stalks celery, washed and cut in half 
  • the leaves from the heart of the celery, washed
  • 2 carrots, peeled and cut in half
  • 2 potatoes, scrubbed and quartered
  • 1 small turnip, peeled and quartered
  • 1 tsp black peppercorns
  • a decent sized pinch of salt
  • 2 bay leaves
  • the turkey carcass, meat removed (yes, this means just the bones!)
Cover all this flavour goodness with cold water.

Bring to a boil, reduce heat and let it simmer for the evening.  (You may have to check on the pot every now and then to skim off the foamy stuff.)


What to do with the goodness of turkey stock you ask?
  • make turkey soup (saute onion, carrots, celery, potato cubes; add stock to cover and simmer until veggies are cooked.  Add noodles or rice and seasonings such as salt, pepper, poultry seasoning)
  • use it to make the sauce or gravy for a turkey pot pie
  • use that turkey pot pie filling to make 'hand pies' using the dough from the 'Mo pizza' post.
  • freeze it use to make soup later (but don't forget about it!)
  • add flavour to stews
  • freeze in ice cube trays to add fat free flavour to stir fry, to saute veggies in, or to thin other thick soups
What ever you do with that leftover turkey, don't forget about it like I did.  It just doesn't look pretty when you find things like that in your freezer. I couldn't even bring myself to take a picture of it!!

Monday, October 11, 2010

Gobble, Gobble: Turkey day Tips


I think this year may truly have been a relatively stress free Turkey day. We enjoyed a nice lunch out at a restaurant yesterday with Hubby's parents and today it is just the three of us.  Being a teensy bit nostalgic, I still wanted turkey with all the trimmings.  I even ordered a fresh turkey from same place Mom used to (I am sure she would be proud!).  We will have some fantastic leftovers this week, some to freeze for later and I will even make some turkey stock!

Today's menu included turkey, mashed potatoes, bread stuffing, bacony brussels sprouts, buns, scurly, and gravy.  We haven't had dessert yet as we are waiting for our tummies to recover. For those who don't know, scurly is sort of a 'poor  man's haggis'.  It is a classic Scottish style oatmeal based stuffing that family members crave around this time of year.  It is probably the most unhealthy stuffing in the world which is why we only have it once a year! When we are ready it will be the pumpkin spice cupcakes and the pumpkin tarts I made yesterday!

Turkey with all the trimmings is a big order no matter how many people you cook for when you have a tiny kitchen.  One of my favourite tricks (tips) for making more stove top space is to use crock pots.  I make a bread dressing in one of the crockpots and mashed potatoes in the other!  There have been years where I have had everyone bring their crock pot over early and made good use of them.

Tasty stress free turkey day helpers starring:   CROCKPOTS!!!!!!

Crockpots are useful and lend to a stress free holiday meal because:
  • Crockpots won't boil over
  • There is no need to keep a close watch on the stove
  • It frees up some time for visiting or relaxing
  • It is just plain easy!

To make mashed potatoes a la crock pot:
  •  Put a kettle of water on to boil
  • Scrub potatoes
  • Cut into 1 inch cubes (smaller cubes will cook quicker)
  • Leave the skin on....it is tasty, healthier, and easier than peeling!
  • Place potatoes in crock pot
  • Add boiling water to cover the potatoes - using the hot water from the kettle helps save the time it would take for the crock pot to heat that much water.
  • Turn crock pot on to high
Potatoes should cook in about 4 hours
  • Drain potaoes and mash with butter and cream (or whatever other things you like to add!) 

Bread stuffing in the crockpot:
  • I like to buy a loaf or two of french bread or multigrain from the local bakery.
  • cube or tear the bread into large bite size pieces
  • place on a baking sheet and toast in the oven at 350 degrees F until toasty (about 10 minutes)
  • place toasty bread cubes in crock pot
Saute in a pan until translucent:
  • 1 onion, chopped
  • 2 stalks celery, chopped
  • 1/4 to 1/2 cup butter (this depends on your personal tastes)
  • 2 tsps poultry seasoning (or to taste)
  • pinch salt and pepper
(if you use 2 loaves of bread, double the amounts for the other ingredients as well!)
    Once translucent and bubbly add:
    • 2 cups turkey or chicken stock (if you have already boiled the neck and pieces to make a broth, use it)
    Carefully pour this mixture over the toasted bread pieces and mix thouroghly.  You may want to adjust the amount of liquid, depending on how wet or dry you like your stuffing.  Today when I checked the crockpot, it was dry so I added some more hot turkey stock.

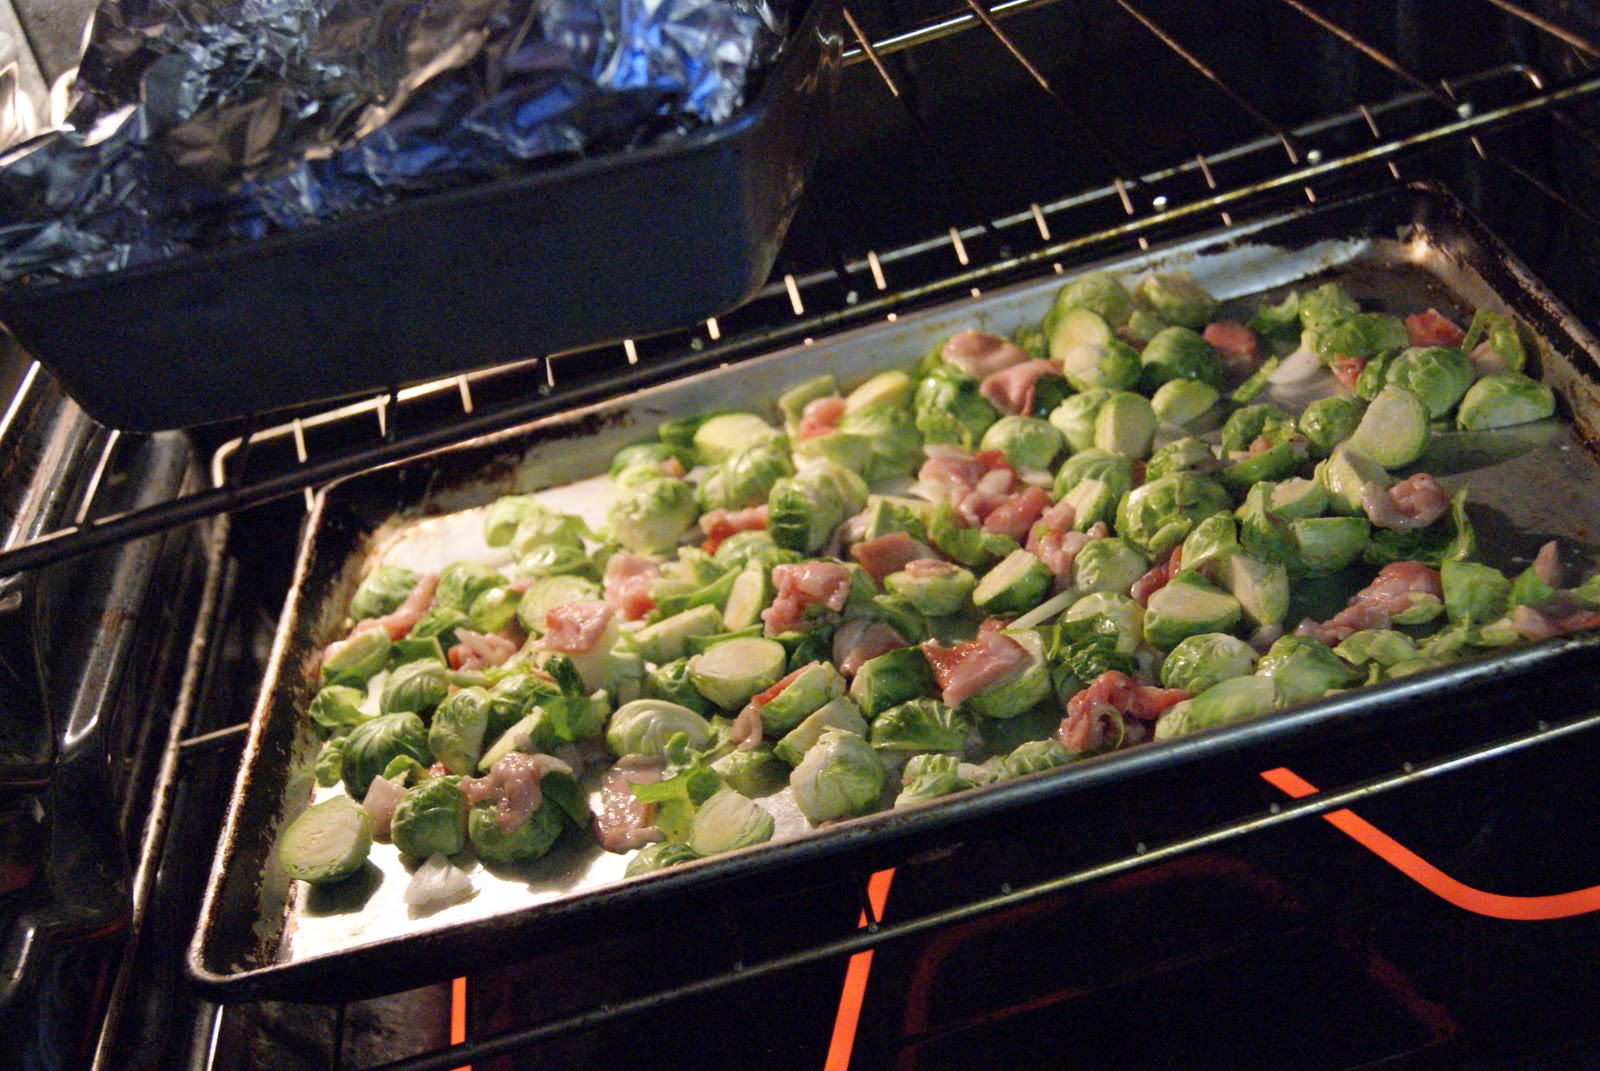
     Brussels Sprouts really are better with bacon (Even my 14 year old son eats brussels sprouts!)
    • Wash, trim, and cut in half fresh brussels sprouts
    • Chop 5 slices of bacon
    • slice 1/2 onion
    • Toss together on a baking sheet with 1 or 2 tbsp oil
    • Separate bacon pieces and onions while mixing with your hand to coat the brussels sprouts
    • Bake in 350 degree F oven for about 20 minutes, or until bacon is cooked and brussels sprouts are golden and carmelized.

    I hope everyone has had a wonderful Thanksgiving and have been able to spend it with loved ones and remembering those who can't be with us. Enjoy your turkey comas!

    Sunday, October 10, 2010

    Pumpkin, spice, and everything nice

    There are times when we have a very tough time being 'traditional'.  I like the idea of traditions and try to keep in touch with some of the traditions we had as kids but most of the time honoured family traditions tend to be food related.  Pumpkin pie is one of the most tasty traditions I know.  Every Thanksgiving my Mom would look after the meal and my Aunt would look after the pumpkin pies!  It always proved to be a tasty combination. I remember the excitement of the Turkey in the oven, Mom's special Scottish stuffing known simply as "Scurly", helping to mash the potatoes, and just hanging around the kitchen all day.  I wonder if I was actually helpful or just being a pest.  Dinner always seemed to turn out great!  The next big excitement of the day came as we eagerly watched our Aunt walk up the front walk with pumpki pie in hand!  I think having something like pumpkin pie saved for this time of year makes it all the better as it becomes such a treat!!

    Somehow I managed to marry one of the few people I have ever met who does not like pumpkin pie. (Strangeness abound!)  My Aunt would still make her delectable pumpkin pies but she would also make brownies for my dear Hubby.  I found (and of course adapted somewhat) a recipe for a pumpkin spice cake that I bake in cupcake form.  These cupcakes are a hit with everyone (Hubby included) and have become a tradition in our house.  These are so popular that I was even asked to make them for Darryl and Mandy's Wedding!  This weekend, I have made the pumpkin spice cupcakes but to also apease the pie lovers, I have down sized the pie into tarts.  I hope they taste as good as they look.  I may have to ask my Aunt for her recipe though.  For now we will try out these.  All they need is a dallop of whipped cream!


     So many smells, tastes, and textures to remember and savour.  My only wish is be able to once again have Mom at the table with us for our delectable meal.  She is terribly missed but fondly remembered as I cook up some of the family's favourite dishes that she would only make for Thanksgiving.

    Today I share with you my beloved Pumpkin spice cupcake recipe. I originally found this cake recipe from Martha Stewart.  It was an instant favourite.  I haven't made it as a cake for quite some time.  Instead I have been making cupcakes! Some of Mom's recipes may have to wait to be shared.

    Pumpkin Spice Cupcakes
    Printable recipe
    Pre heat oven to 350degrees F.

    In the bowl of your mixer combine:
    • 1/3 cup canola oil
    • 1 1/2 cups sugar
    • 2 large eggs
    Mix well until it takes on a lightened colour and is nice and smooth.

    Add to the bowl and mix well:
    • 1 cup pumpkin puree
    • 1/2 cup warm milk
    In a bowl, combine the dry ingredients:
    • 1 2/3 cup flour
    • 1 tsp ground cinnamon
    • 1/4 tsp ground nutmeg
    • 1/4 tsp ground allspice
    • 1/2 tsp salt
    • 1/2 tsp baking powder
    • 1/2 tsp baking soda
    Add the dry ingredients to the mixing bowl and mix with the paddle attachment until well blended.  The batter should be smooth but not overmixed...I know that doesn't make sense but bear with me!

    Scoop into lined muffin tins.  Fill to about 2/3 full.  I like to use a scoop to ensure same size cupcakes.
    Bake for about 20 minutes.  Test for doneness by inserting a toothpick in the centre of a cupcake.  If it comes out clean, they are done.  Cool in the pan for about 10 minutes, then remove from the muffin pan and cool on a rack.

    Once these are cooled...it is time to make the icing!!!

    Brown Butter icing.
    Printable recipe
    In a small saucepan, melt:

    1/2 cup butter
    Let the butter get all foamy and cook it until golden brown sediments form on the bottom of the butter.

    While the butter is melting, place in a bowl:
    • 2 cups icing sugar
    • 2 tsps vanilla
    Once the butter is a nutty brown colour, gently pour it into the bowl with the icing sugar. Make sure to leave the browned sediment in the sauce pan!!
    Start mixing the icing and add:
    • milk, 1 tbsp at a time until the icing is the consitency you want.  Add more milk if you want a glaze like icing.  
    This icing has a nice consistency for spreading but sets quickly so it is important to use the icing right after you make it.

    Saturday, October 9, 2010

    Mo Power To You!!

    This morning while I was 'slaving' away to make those tasty buns (which by the way went to my lovely neighbours for not only lending us their lawn mower when ours stopped working but will also fix our lawn mower for us...we also bought them beer!), my dear sweet hubby went to the store.  When he returned from running his errands (aka buying beer for the neighbours) he also brought in a brand new KitchenAid professional series 5 stand mixer!!!!!!!  I couldn't believe it!  I showed him a flyer the other day which had the stand mixer on sale and joked about upsizing.  Now don't get me wrong, I was rocking the red Hamiton Beach model just fine but with my penchant for doubling recipes, this one is SWEET!!!  I always wished for an extra bowl for the old model but now perhaps I can just work with 2 mixers??? I am giddy with kitchen power!  I made another batch of the honey seeded buns, a batch of pumpkin spice cupcakes (which will need icing), and a pie crust dough (which will need a pumpkin pie filling).  That is what it means when I say giddy, nay drunk with kitchen power!!
    This new member of my kitchen famliy needs a name, any suggestions?

    How to fill your house with the aroma of fresh baked bread

    I doubt there is anyone around who doesn't LOVE the smell of fresh baked bread wafting through the air!  I absolutely LOVE the smell of baked bread so this morning I baked some fresh buns.  I have made this dough a few times over the past month.  Buns go into a zip top bag in the freezer and get used with supper or to make sandwiches for lunches.  If I decide to make loaves they get sliced (after they have cooled) and put into a freezer bag.  The slices are great for toast or sandwiches.  Homemade bread has no preservatives so it can go mouldy if you don't eat it or freeze it fairly soon after you make it.  This particular recipe I have adapted from Gordon Ramsay's 'Healthy Appetite' book.  !  People who know me know that I have trouble following instructions so many recipes I use are generally altered to suit my failure to follow along.  
    As usual, I have doubled the original recipe.  If you are going to mess up the kitchen, you may as well make it worth your while!


    Seeded Honey Loaf or Buns
    In a bowl combine,
    • 4 1/2 tsps yeast
    • 2 1/2 cups warm water 
    • 1/4 cup honey
    • 6 tbsp olive oil
    While this mixture is working to get a foamy, in the bowl of a stand mixer combine:
    • 2/3 cup whole wheat flour
    • 3 1/2 cups white flour                 
    • 2 tsps kosher salt

    You can play around with the ratio of whole wheat flour to white flour.  You can replace up to 1/2 of the white flour with whole wheat without sacrificing the texture too much.

    Add aproximately 4 tsps of each of the following:
    • poppy seeds
    • sesame seeds
    • pumpkin seeds
    • flaxseed
    • sunflower seeds
    • milled flaxseed
    • handful of wheat bran
    This is the part where you can alter what you add.  If you don't like one of the items, swap it out for another item!

     
    Mix the flours and seeds to combine.
    Add the foamy yeast mixture and keep mixing with the dough hook.
    As the dough comes together, you may need to add more flour. Depending on many different reasons, you may have to add up to 1 more cup of flour.  This is fine and will not alter the dough.  The dough will be soft but shouldn't be sticky.  Knead for about 5 to 10 minutes.
    Knead the dough around with your hands for a couple of minutes and form it into a ball.  
    Place the dough ball into an oiled bowl, cover with a tea towel and allow to rise to double. This will take about an hour.


    Punch the dough down!  Get those frustrations out!

    To form into 4 small loaves, divide the dough into 4 equal portions and shape into oval shaped loaves.  Place loaves on a parchment lined baking sheets.  Cover with a clean tea towel and allow to rise until double, about an hour.  Bake at 400 degrees F for about 20 minutes.  Fully baked loaves will be a dark golden brown and sound hollow on the bottom when tapped.

    To form buns, measure out pieces of dough into approximately 100g portions.  I generally go for between 98 and 102g portions.


     Shape these portions of dough into balls and place on a parchment lined baking sheet.
    Cover the buns with a clean tea towel and allow to rise until double, about another hour.

    Preheat the oven to 400degrees F during the last 15 minutes of the second rise.

    Bake for 17 to 18 minutes until a nice golden brown on top.