Wednesday, August 1, 2012

Preparing For the Zombie Apocalypse (I Mean Winter)


 Fresh veggies straight from the garden or farm are one of the best things about summer. Many times our snow peas don't even make it into the house (I need a Scare Hubby and Scare Teen, not a scare crow!)! Hubby brought home yesterday's CSA goodies and boy was it a great week! Rainbow carrots, cukes, zucchini, gold beets, green pepper, beans of every colour.....sooooo good.

We munched on a plate of fresh carrots, cukes, and green pepper paired with a homemade ranch style dip. I am proud to say the herbs for this one came from the garden!!


Ranch style dip

¼ cup mayo
2 tbsp sour cream
lemon juice (From one wedge)
2 – 4 tbsp buttermilk (enough to thin it to whatever consistency you want)
1 clove garlic, grated
1 tbsp chives, chopped
1 tbsp flat leaf parsley, chopped
1 tbsp dill, chopped
salt and pepper

Mix everything together. Taste and adjust seasonings or herbs as needed. If using as a salad dressing, add more buttermilk to thin out the dip.

Now onto preparing for the zombie apocalypse winter.  I started pickling today. (no,  I don't mean drinking, but sometimes it is tempting.) I mean pickling some of the fresh veggies for later use. Prairie living does require some prep and saving our summer bounty, especially back in the days of yore when people didn't have grocery stores full of produce. Canning your own garden or farmers' market buys is one way to ensure local food is an option all year round.

My mother in law and I made pickles once or twice. We bought a bunch of jars and went all out.  The we got out of the pickling game and those jars sat in the basement. Eventually I gave the jars to a friend who needed them.

I have bought some new jars and have even cleaned out all my old spices and dried herbs that I bought in mass quantities from a Mom's Pantry fundraiser years ago and placed in mason jars of varying sizes. I knew the herbs and spices were way to old to use but just never got around to tossing them.  I have jars a plenty, for now.

These old herbs are gone!!!
If you read my post from the other day, I have been reading my way through The Little House Cookbook by Barbara Walker which has inspired me to do some more traditional type of cooking, including pickling. I have quite a few beets in the garden and will soon be overrun with zucchini so why not give the pickling a go?

The on going joke around the Little Kitchen is I am really just learning skills to survive the zombie apocalypse when it occurs...The Boy tells me he never really thought about that side of it, just the killing the zombies part....he's so pretty.
I managed to get 4 jars of beets and 3 jars of zuchinni spears pickled today.  I'm not going to post the recipes today but I will. I want to take more pictures of the process, and this post is rambling on.

Plenty of room in the Little Kitchen for a canning setup!
Until next time, stay warm (avoid zombies) and eat well!

Sunday, July 29, 2012

PhDs, Books & Lemonade, Oh My!


Oh Summer, you seem to pass by so quickly. Before we know it, it is almost August. Yikes!! We have been busy. My sister defended her PhD thesis last week so we had to have a BBQ and a cake.  A Yoda cake to be exact....She will be a Jedi Master following fall convocation. This is a big deal in our Prairie dwelling family of Jedi nerds.
I still need to practice the Yoda cake, but always fun!
 Things have calmed down around the Little Kitchen and I have even been able to get back to reading one of my favourite books. Many of you probably figured out that I have long been a fan of Little House on the Prairie (both the books and the tv show). I know, who'd a thunk it?

I bought this book last year when we were in St. Louis, MO and I even read through it last summer and enjoyed it. All this book has done has re sparked my interest in the Little House On The Prairie books to the point where I would like to read them again. This book has recipes that Ma Wilder used (or similar to ones she would have used).

 
That's right, The Little House Cookbook by Barbara M. Walker has become a favorite. Not so much for it's recipes but for some of the descriptions of the frontier life and the simple living (that was actually labour intensive).  Walker also uses excerpts from the Laura Ingalls Wilder's books where she describes in great detail the foods, the smells, and the feelings of the food. From the times the family nearly starved all the way to the richer times, Laura's life revolved around family and food.

I just like this book. I keep wanting to try some of the recipes from it. I am thinking the pickled beets would be great since I have a garden full of beets. I will work on that in the next while.

In the meantime, I am still making ginger syrup but have also started making lemon syrup for lemonade...oh and am I in love with lemon syrup...(especially with a shot of rum or gin or vodka in it....)


With many thanks to Pinterest for helping me find this one. The recipe actually hails from the Anne of Green Gables Cookbook (perhaps another one I should pick up...) but I found it on the Simply So Good Blog.  Perhaps I was drawn to this recipe over others due to its traditional roots.

It really is simple:

1 1/2 cups sugar
1 1/2 cups water
1 1/2 cups lemon juice (fresh squeezed please)
zest from one lemon

Boil the sugar and water for about 5 minutes. Add the zest and lemon juice and allow to cool.  Transfer to a jar or other suitable storage vessel.

This works well using 1/3 cup syrup to 1 can of club soda or the equivalent amount of cold water. (Don't forget that shot of rum).

Adding some frozen fruit is fabulous as well...I like frozen blueberries but fresh strawberries muddled in the bottom....raspberries....blackberries....you get the idea!

Frozen blueberries

Fresh strawberries
We also got a fabulous haul from our CSA this week....


Check out other fabulous recipes at the Melt in Your Mouth Mondays Link up!

Until next time, stay warm keep cool and eat well.

Thursday, July 19, 2012

The Zucchini Season Begins: Zucchini Fritters


Our CSA pick up from Almost Urban Farms netted us some extra zucchini along with our other goodies this week. There was a bin filled with extras and a note inviting people to take an extra one. I know some of this extra zucchini will become a fabulous chocolate cake but I can only make (and eat) so much cake.  Last night with dinner, I made some zucchini fritters to go with the sliced roast beef I pulled out of the freezer. The fritters themselves are more like a potato pancake, without the potato. I have made these with grated potato before and they tasted wonderful but last night, I wanted to try these with all zucchini. The Boy has been eating the leftovers all day. (Because 16 year old boys eat pretty much all day)


Zucchini Fritters - printable recipe

4 cups zucchini, grated (I used half yellow, half green)
1 onion, grated
2 cloves garlic, grated on a micro plane, or crushed
2 green onions, chopped
handful of parsley, chopped
1/2 cup flour
1 egg
salt & pepper
Canola oil for frying

Heat up a large skillet over medium high heat with a small amount of canola oil in the bottom. This is a good time to line a baking sheet with foil, place a rack in the pan and plunk it in the oven. Set the oven to warm. This will help you fry all the fritters in batches and keep them warm.

Grate the zucchini, onion, and garlic into a large bowl and mix in the green onions, parsley, flour, salt & pepper and the egg.

Mix well to combine everything. It will look gummy and pasty, but will fry up a nice golden brown.

Once the oil is nice and hot (a drop of water will skip across) drop the batter by large spoonfuls and gently flatten them out.

Fry the fritters until golden brown on the edges and they start to dry out a bit on top then gently flip them over to finish cooking. (Be gentle so you don't splash the oil)

Transfer gold brown fritters to your pan in the oven to keep warm until the entire batch is cooked.


Last night these little gems were served up with hot roast beef sammies. Thank goodness for leftovers in the freezeer!!

Until next time, stay warm and eat well!

Our fabulous bounty this week!

Sunday, July 15, 2012

Rhubarb Blueberry Crumble

As I was relaxing in my newly fenced in back yard I started checking out the garden and wound up harvesting a small bunch of rhubarb from my garden. Believe it our not, I did have a recipe in the back of my mind. The latest edition of Everyday Food had a crumble recipe in it with a variations chart so you could switch out other fruits for the one used in the original recipe.

As I was chopping up the rhubarb, I only had four cups of the yummy stuff so I turned to my trusty freezer which just happened to have some blueberries nestled away inside. I adapted the recipe somewhat. Since the blueberries were so sweet, I was able to reduce the amount of sugar in the fruit. I also added some oats to the crumble topping because I always use oats in crisps and crumbles...I just do.  As a matter of fact, a few years ago, the Boy took his first foods class in middle school and came home completely appalled.  Absolutely disgusted to tell you the truth.  You see, after years of making apple crisp our way (leave the peels on, oats in the crust, butter....) The Boy had to make apple crisp in foods class the way their book said so he unhappily peeled apples and chopped them (rather then small wedges), used margarine (GASP) in the topping, had no oats to add, nor did they add nearly enough cinnamon... He really was unhappy with the foods teacher that day. (Poor kid, I've wrecked him for 'normal' foods classes....tee hee)


Rhubarb Blueberry Crumble (adapted from Everyday Food, July/August 2012)
Preheat oven to 375F

Fruit filling:

4 cups rhubarb, sliced
2 cups blueberries
1 cup sugar
2 tbsp cornstarch

Mix all 4 of the above ingredients gently in a bowl.

Topping:

6 tbsp butter, room temperature
1/4 light brown sugar
1 cup flour
1/2 tsp salt
1/2 cup rolled oats

Cream together the butter and sugar.
Add the flour salt and oats and continue creaming until it all comes together into a clumpy lumpy texture.


Pour the fruit filling into an 8 inch baking dish.


Scatter the topping over the fruit.
This is a pile, make sure to spread it out evenly over the fruit.

Bake for 40 to 50 minutes until the fruit is bubbly and topping is golden brown.


Allow to cool for about 20 minutes before serving (or allow to cool and heat before serving).


We actually waiting until AFTER dinner to eat this tasty treat....of course we had some frozen vanilla yogurt with it.
Soooo good.  Go make some.  Right now. Do it.
Trust me.

Until next time, stay warm and eat well.

Friday, July 13, 2012

Late Breakfast or Early Lunch?

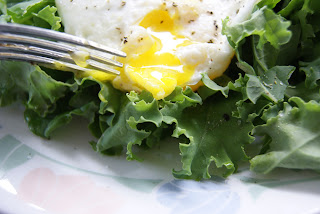
Breakfast this morning Lunch this afternoon was another super simple meal. (It is my summer vacay so sometimes brekkie happens at lunch...) I cooked 2 eggs over easy and served them on a bed of farm fresh kale and a side of multi grain rye toast.  It was simple, easy, and didn't heat the kitchen up.

I must admit that I have never really tried kale. It is always used as decoration and I never really thought about eating it.  We tried making the kale chips last week, but no one liked them. As a matter of fact, it almost deterred us from trying the kale again. A friend mentioned using a dehydrator instead so I will have to look into that. I think next time it needs a side of fruit but I did enjoy the kale on it's own with the runny egg yolks.


Until next time, stay warm cool and eat well.