Today I made a vanilla cherry cake. I baked it in a Wilton ball pan so I could make my first try at making a baseball cake for my boys. I am fairly happy with the outcome. It is afterall, my first cake of this shape.
Original recipe
Preheat oven to 350
Butter and flour the pan(s) of your choice.
In a bowl, combine:
Measure out and set aside:
- 1 ½ cups buttermilk
- 1 375 ml jar maraschino cherries
In the bowl of your stand mixer cream together:
- 1 cup unsalted butter, at room temperature
- 1 1/2 cups granulated sugar
Add and continue to beat:
- 4 eggs at room temperature (one at a time)
- 4 tsp vanilla
- 1 vanilla bean, scraped (I wanted to add as much vanilla flavour as I could so I decided to give it a try!)
Alternate additions of ½ of the flour with ½ of the buttermilk This way you start and end with adding the flour mixture. Mix until just combined to avoid a tough cake.
Stir in the chopped and drained maraschino cherries.
When filling your pans, make sure to stop at no more than ¾ full.
Bake in the centre of the oven for 20 to 30 minutes. This time varies greatly because it does depend on the size(s) of pans you have used.
Remove pans to a rack, cool for 15 minutes, then remove cake from pans to cool completely before icing.
Allow the cakes to cool completely before icing them.
Decorator's icing - original recipe here
- 1 cup vegetable shortening
- 8 cups icing sugar
- 1 tsp clear vanilla extract (the only time to use the fake stuff)
- 1 tsp clear butter flavouring
- approximately 1/2 cup water (depends on desired consistency)
Add the flavourings and the water. Mix until smooth, adjusting amount of water or icing sugar until the icing reaches a spreadable consistency.
Before you attach the 2 cakes, you will need to trim the tops to make 2 flat surfaces that will face each other evenly. (I failed to take picturs of this process....my apologies)
Get your base ready (if you are just making the ball, trim one end so it is flat and the ball will sit without rolling away).
Apply a crumb coat to the entire cake. (A crumb coat is a thin layer of icing that will help keep crumbs on the cake and not on the surface of your finished cake)
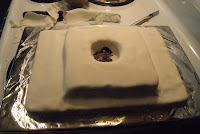
For this cake I cut a hole in the top layer so the ball would have a place to nest in. I still used a wooden dowel through the centre of the ball to help keep it on the cake and to help keep the ball together...consider it my insurance)
Let the crumb coat settle and get crusty. You don't want your top layer of icing or fondant (if using) to mix in. The crumb coat is meant to be a separate layer.
Colour some of the icing your desired colour. Prepare and fill your icing bags. (We can cover this process in another post)


Wow! Form and function! That looks really great - and delicious, too!
ReplyDelete