Monday, January 31, 2011

Buns, Borscht, Beer, and Friendly Neighbourhood Snow Clearing

Everyone deserves friends and neighbours like ours!! Our friends look out for us (and vice versa).  These particular friends have all the tools you could ever need to borrow (and they know how to use them).  They also fix the lawn mower when it is broken, look after the house and the cats when we are out of town, and help us out with their snow blower after a big snowfall!  Wow!  I just made it sound like they do everything for us.  We do our best to return the favours and look after their house and their adorable dogs.  We also buy the occasional case of beer for them, but I also like to bake for them every now and then...I do like to bake occasionally you know.  I know at least one of them likes the honey seeded buns I make so I can make those, but these lovely Oatmeal Ale Roles I found over on the Flour Dusted site just might do the trick!  They do have beer in them after all! (If you haven't been over to the Flour Dusted site, you really are missing out!

I decided to also make some borscht today, since it was so cold and soup always helps to warm people up.  I like to use the recipe from Gordon Ramsay's Healthy Appetite book.
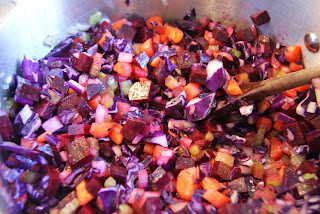
Love the colour of those beets!

Borscht
From Gordon Ramsay's Healthy Appetite
Printable recipe
  • 2 Tbsp Olive oil
  • 1 onion, peeled and minced
  • 2 celery stalks, trimmed and minced
  • 1 large carrot, diced
  • 1 thyme sprig, leaves stripped
  • Salt and pepper
  • 1 lb raw beet, peeled and chopped
  • ½ red cabbage, about 8 oz minced
  • 3 ½ cups vegetable stock or water
  • 1 tbsp red wine vinegar
  • 1 tsp sugar
  • Handful of dill, chopped
  • 4 tbsp sour cream or plain yogurt, for serving
Heat a large pot and add the 2 tbsp olive oil.

Saute the onion, carrot, and celery, thyme, and some salt and pepper for 8 to 10 minutes, stirring occasionally

Add the beets and the cabbage along with about 1 cup water.  Let the veggies cook, stirring occasionally for about 10 minutes.


Add the veggie stock (or water) to the pot.  Cover the pot with a lid and let it cook for 15 to 20 minutes until the veggies are tender.
When the veggies are tender, transfer the soup in batches to the blender and blend.  I like to leave my borscht a little chunky so I don't blend it too much.  You can also use a stick/immersion blender as well.
If the soup is too thick, add some water of stock to thin it out.  Server warm with a dollop of yogurt or sour cream and some chopped dill on top.
So sad, I didn't have any dill....but it still tasted wonderful!

Remember to send some soup and buns over to the nice neighbours who used their snow blower to clear the snow from you walk and drive way!!

The adorable dogs, from left: Kobe, Bella, and Cinqo...they are so cute!

So the plows finally came and did a thorough job and scrapped the built up snow off the roads.  Then it got piled up on the sides of the roads...fun...this means we have to shovel a path through these piles to make the side walks accessible!  Just to show how much snow is piled up, I took a few pictures.  Currently we are over the average amount of snowfall for the year and the winter isn't over yet..Oh well.  We will just have to wait and see how much more we will get.

This one on the corner is about 5 feet high!
This one is as tall as that SUV parked there!!!
The one is almost as high as the garage!
 Stay warm and eat well!


Borscht on FoodistaBorscht

A Week's Worth of Brekkies

A great way to get going on these cold winter mornings in is a hot bowl of oatmeal! I don't have time every morning to make a pot of good old fashioned oatmeal but I am not a fan of the prepackaged instant oatmeals, they just aren't the same. The oats have been so over rolled there isn't nearly as much fibre left in them as there should be and I can make my own flavours with natural ingredients.  If I want maple flavoured oatmeal, I will just add maple syrup!

My breakfast is happy to see me!
 I generally buy the generic brand of steel cut oats or multigrain oats and cook up a week's worth of oatmeal on Sunday afternoon or evening.  Follow the instructions on the box to cook up the oatmeal and divy the oatmeal out into single serve portions into bowls (with plastic wrap) or containers with lids if you have.  All you have to do in the morning is pop it into the microwave for a minute or two and you are ready for the day! (Or grab it to take to work, use the  microwave in the classroom/staffroom and let the kids watch you enjoy your oatmeal!)

Cook the oatmeal according to package instructions.


Here's where you can adjust the flavours to suit your mood:
  • Switch out the water for another liquid such as juice, coconut milk, soy milk, milk....even tea
 
While cooking add to the pot the flavours of your choice:
  • 1 chopped apple (keep the peel), handful of raisins, 1/2 tsp cinnamon
  • handful of chopped dates (sweetness), shredded coconut,
  • pumkin pie spices and smow pureed pumpkin
  • chopped pineapple, coconut, and some rum extract (Do you like pina colodas?)
  • a handful of chopped dried apricots, some chopped walnuts...
  • dried blueberries
The possiblities really are endless, just use your imagination.
Today I felt like apples, dates, and cinnamon!

Lately I have been adding some frozen strawberries and a gulp of maple syrup before popping it into the microwave for 2 minutes.

Being prepared for the week ahead helps keep morning mayhem to a minimum.  Get up, get ready, have breakfast, and go.
One for each day of the week!! This batch has apples, dates, and cinnamon in it but I will most likely add some maple syrup and strawberries in the morning!  This really does save so much time in the mornings.

Saturday, January 29, 2011

Saturday Night Stir Fry, If You Know What I mean....

 I don't know what that means but it sounded funny....

Hubby and I once again braved Saturday afternoon grocery shopping...what a zoo!! We did try to stick to our list and kept to the edges of the store, only venturing into the middle aisles to grab a couple of baking items!  I could see Hubby was coming up with an idea for dinner by what he was putting in the cart...bok choy, mushrooms, tofu, ginger root, steamed noodles... it turned out to be stir fry night in the Little Kitchen!  Stir Fry is one of those things that we really don't follow a recipe for.  If you like it, toss it in, if you don't like it, keep it out! Tonight Hubby and worked together in the kitchen to chop, stir, and fry our way to dinner!

While Hubby chopped up some of the following veggies:

  • 1 onion
  • 2 stalks of celery
  • 1 red pepper
  • 5 stalks (leaves) of bok choy, leaves and bottom parts
  • 3 green onions
  • a handful of mushrooms
  • a handful of broccoli florets
  • a few cloves of garlic, sliced
  • a chunk of ginger, peeled and grated

 I patted the tofu dry with some paper towels and then diced up the tofu into bite size pieces!


Heat up a fry pan and add some canola oil.  To the oil I added:
  • a few cloves of garlic, smashed
  • a few coins of ginger, peeled
  • a healthy pinch hot red pepper flakes
  • a couple strips of lime peel
Once the oil was hot and fragrant, we fried the tofu pieces until crisp, transferring the done pieces to a bowl lined with paper towel.  Reserve the oil for your stir fry!

So we had a little help in the veggie department...tastes as good as ever!
When all of the tofu was cooked, it was time to heat up the pan for the stir fry!!

First I fried up the garlic, ginger, and onions.

Then added the mushrooms for a few minutes.  Next up, the rest of the veggies!


Put a large pot of water on to boil so you can cook your noodles.


Cook noodles according to package directions.

Transfer those noodles to the stir fry.

Add some fresh chopped cilantro and a squeeze of lime juice!


Hooray for team work!!


Ready to eat!!!  Hooray!!  Now where are my light sabre chop sticks?

Saturday Mornings: Buttermilk Biscuit Sammies!!

Best Biscuits Ever!!
 YES!  I  LOVE breakfast!!! Saturday mornings seem to be the day for laid back brekkies in the Little Kitchen....this could have something to do with the Boy's 6:00am Sunday morning practices, but who knows.  During the week, especially in winter, I stick with my oatmeal and fruit but on the weekends, I like to treat us to some yummy breakkie treats, such as last week's breakfast muffins!!  I have been wanting to try the buttermilk biscuits Gareth posted on Stumptown Savoury.   These turned out so incredibly fantastic!  Now I thought about mixing in some grated cheddar and chopped up ham but I really wanted to give these biscuits a go plain, just to try them out....WOW!  You really should make these.  I am not going to even try to post his recipe here but I will send you to his blog so you can get the recipe direct from him! Click here for his post on buttermilk biscuits!

Sooo gooooood!!

As I rooted through the fridge, I found some more things I could possibly mix in but then I remembered how much the Boy loves to make sandwiches out of everything!  No, really, he does....last week he made a sandwich out of the breakfast muffins!! (I should have taken a picture). I found some left over frittata from dinner the other night as well as some tomatoes, ham, and cheddar!!  Winna, winna, breakfast sammie flava! 
Breakfast sammies it is!!

Since I had everything but the biscuits on hand, I made the biscuits and while they were in the oven, I sliced up:

  • 1 tomato
  • some cheddar cheese
  • some ham


I also took out of the fridge and cut into sammie size pieces the leftover frittata from the other night. This particular fritatta has in it.
  • potato slices, cooked
  • onion
  • yellow pepper
  • 1 jalapeno
  • 1 10 oz pkg frozen (but thawed and squeezed out) spinach
  • a handful or two of halved cherry tomatoes
  • cheddar cheese, cubed
  • 8 eggs
  • 1/2 cup evaporated milk (no water added, straight from the can) (I was out of milk and half and half)
Frittatas are simple. In a large, over proof skillet, saute the onion, peppers, potatoes and  spinach until hot.
In another bowl, beat the eggs and the evaporated milk.
Pour the eggs over the yumminess in the pan and give that pan a quick stir or a shimmy shake to evenly distribute the eggs.
Top with (they will sink in a little) the small cubes of cheese and the cherry tomatoes.
Place in a 350F oven until cooked through, about 20 minutes.


When the biscuits were ready, I split them, layered in the sammie ingredients, took some photos, and was so incredibly ready for breakfast, it wasn't even funny!


I heated the frittata in the microwave so it was hot for the sammies!

Wednesday, January 26, 2011

I Learned Something New Today!

Today while giving my stove a thorough wipe down after cooking, I decided it was time to pull all of the knobs off to help get everthing spic and span.  While I have done this before, I have never really looked at the back of the oven temperature knob before.  I discovered that should the temperature in my oven ever go wonky, I can adjust it myself using the screws on the back of the dial!!  Wow!  I have the power to adjust the overall temp if it ever runs too hot or too cold!  Another reason why one of those oven thermometers you can put inside the oven is useful!
Pretty darn cool if you ask me!

Tuesday, January 25, 2011

Online Bake Sale for a Great Cause!!

You are invited to participate in an online bake sale!!!!


Okay everyone, a fellow blogger needs some help.  She is hosting an online bakesale with some pretty amazing goodies from other foodies! Steph is training for a marathon to raise  money for the Leukemia & Lymphoma Society.  She is part of the Team in Training and has been working hard to run and bake for funds.  So many bloggers have come together to donate baking as a way to help her reach her goal of $1900!!

As a way to help Steph out, I am donating 2 dozen of my Chocolate & Toffee chip Ricotta cookies!!  You can a full list of all the goodies on Steph's website.  All bids start at $15.  In order to place a bid just email Steph at stephsbitebybite@gmail.com on January 31 between 7am and 9pm EST.  Steph will email the winning bidders who will then make their donation directly to her Fundraising page.  It is just that simple!  Once your donation has been made, Steph will let the baker know and that person will send out your goodies!

You can read all about Steph's online bake sale by clicking here.


 If you are able or willing to place a bid or even donate some baking please do so, this is a very worthy cause!

Monday, January 24, 2011

Roasted Garlic Beef Stew

The wind is blowing, the snow is falling blowing coming at me from every which way.  This is the perfect time for another crock pot creation!!  Generally I don't use a recipe when it comes to stews.  You know, toss a bunch of stuff in the crock pot and dinner cooks on its own!  But a friend sent me a recipe they had tried at their house and it looked good so I figured hey why not give it a go?  When I got home from work, dinner was cooked and ready to serve, save a small salad and some bread.  This recipe for Roasted Garlic Beef Stew is from Canadian Living Magazine.  Canadian Living magazine is a tried and true type of magazine when it comes to recipes.  I have a couple of their books on my book shelf. I don't subscribe to this one but I do pick it up every now and then in the store. (They just recently changed their format and I am not a huge fan of it, but their recipes still come out great!)


Roasted Garlic Beef Stew, adapted for the slow cooker
adapted from Canadian Living Magazine

That's right, 12 cloves!
First the ingredient list:
  • 12 cloves garlic
  • veggie or canola oil
  • 2 carrots, peeled and cut into 1" chunks (I used baby carrots)
  • 2 parsnips, peeled and cut into 1 " chunks
  • 2 Yukon gold potatoes, scrubbed and diced into 1" cubes
  • 1 onion, diced
  • 1 1/2 lbs stewing beef
  • 1 tsp kosher salt
  • 1 tsp fresh ground pepper
  • 1 tsp dried thyme
  • 1 tsp dried sage (all I could find was ground so I used less)
  • 1 1/2 cup beef stock
  • 1 cup red wine (or more beef stock)
  • 1/4 cup tomato paste
  • 1 cup frozen peas
  • 1/4 cup fresh chopped parsley
  • 1/2 cup (or so) chopped celery tops (I had some in the fridge so I added them)
    You can add almost anything to a stew so if you have something in the cupboard or fridge hanging around that you want to use, toss it in)

    Ok, that is quite the list, but once you break it down, it is a cinch to put together in the evening to slow cook all day while you work.

    First lets deal with all of that garlic! Put a pan on to heat up to medium while you start working with the garlic.  Add some canola oil to the pan so there is enough oil to cover the cloves of garlic. Let the oil heat up though before you add the garlic.

    Peel the garlic cloves (a slight smash with the side of the knife helps release the skins!) Add the garlic to the oil and let the cloves fry.  You want the garlic to not only infuse the oil but to get all nice and golden brown! YUMMY!  Give the pan a gentle shimmy shake every now and then to ensure the cloves get even golden coverage.


    Remove the golden yummy garlic from the pan and drain.  Also drain all but 1 or 2 tbsp of the oil from the pan.


    Season the meat with salt and pepper.  In small batches, brown the meat in the oil.  Do not crowd the pan on this one!  You want the meat to brown, not to steam.  Brown = yummy, yummy goodness in the crock pot!

    Don't crowd the pan!!
    As the meat browns, transfer them to the crock.  Once all of the meat is done, add the chopped onions to the pan.  Saute the onions until translucent and they have picked up the brown flavour filled goodness from the bottom of the pan.  Add the onions to the pan.


    Add the beef stock, tomato paste, (and wine if using) to the pan and further deglaze all of the yummy goodness from the bottom. Pour into the crock.


    Add the carrots, parsnips, potatoes, and celery to the crock.  Give everything a stir, slap on the lid and store the crock in the fridge until morning!

    Toss it all in the crock pot!
    In the wee hours of the morning, just when you are awake enough to venture into the kitchen to conjure up something for breakfast, take the crock out of the fridge, place it into the cooking apparatus and turn it on to low....and for heaven's sake, make sure it is plugged in as well!! (Don't laugh, I have come home to a cold, uncooked pork shoulder sitting in the crock....so sad.....)

    Remember to add the frozen peas when you get home, these won't take long at all.  Also toss in the chopped parsley!

    All in all this was a tasty stew.  Although I couldn't really taste the garlic as it had mellowed so much in the crock pot I found I was really missing not having a bay leaf or two in the stew for flavour.  Perhaps next time I will add the bay leaf and up the garlic content if I am going to use the crock pot.  

    Stay warm and eat well!