Showing posts with label CSA. Show all posts

Tuesday, June 11, 2013

Sharing The Farm


Today we were lucky enough to get our first farm share goodies of the season. I must say that with the delayed spring (read loooooooong winter) this was an exciting thing.  My own garden has been coming along slowly so it is always a great to get the fresh goodies, even if it is mostly greens and herbs.  I kept pushing back feelings of guilt over my lack of gardening but after a stint with pharyngitis, a sinus infection, an especially long allergy season, and the aforementioned long winter I really could get things done.

I am slowly getting things together in the yard here at the Little Kitchen and trying to stick to my gardening plan.  For now the fresh goodies from Almost Urban are just the treat we need to keep us going.

What did we get? Beets, lettuces, green onions, herbs, a basil plant, a bar of goat's milk soap....so far, so good!


Until next time, stay warm and eat well.


Wednesday, August 15, 2012

Delectable Eggplant Sammies

Our yard renos are coming along somewhat slowly (It's my yard so there's no rush). We have been working on fixing it up, starting with a new fence and removing some trees that were in the way and coming up with ideas to make it a space we can really relax in. Today's plan to raise the sinking shed were put on hold due to rain. This of course allowed us time to clean up inside. (There's always something to do!) Aside from a nap and a trip to the store, I used some of our lovely bounty from the farm to make us a late lunch.

We keep getting such wonderful fresh veggies from our CSA at Almost Urban Farms and this is keeping me busy with cooking ideas. As the summer flys by, we get more and more yummy items in our baskets. This week we got this absolutely gorgeous (and gigantic) eggplant. We got an eggplant last week and I tried grilling it up along with the summer squash and let me tell you, it did not turn out as planned. Grilled zucchini and summer squash are always delish, but the eggplant turned out tough, chewy, and gross...ew...almost made me not want to eggplant ever again.

This week I knew it would wind up breaded, fried, and loving placed between 2 pieces of bread....and you know what? That is exactly what happened!


You will need:

1 eggplant
1 cup flour
3 eggs
2 cups panko bread crumbs
1/2 cup grated Parmesan cheese
1 tsp garlic powder
salt and pepper
1 clove garlic
fresh herbs (today I used rosemary, sage, oregano)
canola oil (enough to shallow fry)
provolone cheese, sliced (or any other good melting cheese)
marinara sauce (or your favourite tomato sauce)
Bread. Choose a good sturdy bread. I found a gorgeous loaf of Italian bread but the sour dough looked good too.

Wash and slice the eggplant into thick slices, sprinkle with salt and lay in a colander to drain.


Line a baking sheet with foil and place a rack on the sheet. Place this contraption in the oven and set the oven for 225 or 250 F, This will keep the cooked eggplant warm and crispy while waiting for the others to cook.

Pre heat a large fry pan and add a good amount of canola oil to the pan.  When the oil is hot, add a clove of garlic and a couple sprigs of rosemary, sage, and oregano. (Remove the herbs from the oil as they get crispy so they don't burn. I kept adding more herbs as I went and this really added a nice flavour to the the finished eggplant)

This is also a good time to heat up your marinara sauce in a small pot on the stove.


While the pan is heating up, you can set up a breading station: Place 1 cup of flour on a plate and mix in a good pinch of salt and a grinding of pepper. In a bowl, break and scramble up the 3 eggs. Finally, in a large bowl mix together the panko, Parmesan, garlic powder and another healthy grinding of pepper.

Review time:
  • baking sheet contraption in the warm oven
  • marinara sauce warming up
  • oil heating up
  • eggplant sliced, salted, and draining
  • breading station ready to go
Now it is time to bread the eggplant and fry to a crispy golden brown!!

Pat the eggplant slices dry with a paper towel (or clean tea towel).

Coat each slice in flour and shake the excess flour and plunk it into the egg wash, make sure it is thoroughly coated and allow the excess to drip off.


Coat the egg coated slice into the panko mixture. You may need to lightly press on the crumbs to help them stick. (Don't forget the edges!)


Carefully place a slice of eggplant in the hot oil and fry until golden brown. Gently flip the slice over and continue to fry. When the slices are all golden brown and yummy, transfer to the baking sheet/rack contraption you have in the oven to keep warm. (I have found that without the rack, the underside of the eggplant will get damp and uncrsipy...so don't skip the rack)


Once you have everything all fried and golden, get the bread sliced, the cheese ready and start assembling your sammie!

Check out the rack on a foil lined baking sheet....
I layered my sammie like this: Bread, sauce, eggplant, cheese, (tossed some kale on too), bread. I only used one slice of eggplant but I should have used 2 (and more sauce)!


If you don't want to fry the eggplant, you can spray it with oil or nonstick spray and bake it in the oven. You won't get the same crispness, but it will bake up nicely.

Until next time, stay warm and eat well.

Wednesday, August 1, 2012

Preparing For the Zombie Apocalypse (I Mean Winter)


 Fresh veggies straight from the garden or farm are one of the best things about summer. Many times our snow peas don't even make it into the house (I need a Scare Hubby and Scare Teen, not a scare crow!)! Hubby brought home yesterday's CSA goodies and boy was it a great week! Rainbow carrots, cukes, zucchini, gold beets, green pepper, beans of every colour.....sooooo good.

We munched on a plate of fresh carrots, cukes, and green pepper paired with a homemade ranch style dip. I am proud to say the herbs for this one came from the garden!!


Ranch style dip

¼ cup mayo
2 tbsp sour cream
lemon juice (From one wedge)
2 – 4 tbsp buttermilk (enough to thin it to whatever consistency you want)
1 clove garlic, grated
1 tbsp chives, chopped
1 tbsp flat leaf parsley, chopped
1 tbsp dill, chopped
salt and pepper

Mix everything together. Taste and adjust seasonings or herbs as needed. If using as a salad dressing, add more buttermilk to thin out the dip.

Now onto preparing for the zombie apocalypse winter.  I started pickling today. (no,  I don't mean drinking, but sometimes it is tempting.) I mean pickling some of the fresh veggies for later use. Prairie living does require some prep and saving our summer bounty, especially back in the days of yore when people didn't have grocery stores full of produce. Canning your own garden or farmers' market buys is one way to ensure local food is an option all year round.

My mother in law and I made pickles once or twice. We bought a bunch of jars and went all out.  The we got out of the pickling game and those jars sat in the basement. Eventually I gave the jars to a friend who needed them.

I have bought some new jars and have even cleaned out all my old spices and dried herbs that I bought in mass quantities from a Mom's Pantry fundraiser years ago and placed in mason jars of varying sizes. I knew the herbs and spices were way to old to use but just never got around to tossing them.  I have jars a plenty, for now.

These old herbs are gone!!!
If you read my post from the other day, I have been reading my way through The Little House Cookbook by Barbara Walker which has inspired me to do some more traditional type of cooking, including pickling. I have quite a few beets in the garden and will soon be overrun with zucchini so why not give the pickling a go?

The on going joke around the Little Kitchen is I am really just learning skills to survive the zombie apocalypse when it occurs...The Boy tells me he never really thought about that side of it, just the killing the zombies part....he's so pretty.
I managed to get 4 jars of beets and 3 jars of zuchinni spears pickled today.  I'm not going to post the recipes today but I will. I want to take more pictures of the process, and this post is rambling on.

Plenty of room in the Little Kitchen for a canning setup!
Until next time, stay warm (avoid zombies) and eat well!

Sunday, July 29, 2012

PhDs, Books & Lemonade, Oh My!


Oh Summer, you seem to pass by so quickly. Before we know it, it is almost August. Yikes!! We have been busy. My sister defended her PhD thesis last week so we had to have a BBQ and a cake.  A Yoda cake to be exact....She will be a Jedi Master following fall convocation. This is a big deal in our Prairie dwelling family of Jedi nerds.
I still need to practice the Yoda cake, but always fun!
 Things have calmed down around the Little Kitchen and I have even been able to get back to reading one of my favourite books. Many of you probably figured out that I have long been a fan of Little House on the Prairie (both the books and the tv show). I know, who'd a thunk it?

I bought this book last year when we were in St. Louis, MO and I even read through it last summer and enjoyed it. All this book has done has re sparked my interest in the Little House On The Prairie books to the point where I would like to read them again. This book has recipes that Ma Wilder used (or similar to ones she would have used).

 
That's right, The Little House Cookbook by Barbara M. Walker has become a favorite. Not so much for it's recipes but for some of the descriptions of the frontier life and the simple living (that was actually labour intensive).  Walker also uses excerpts from the Laura Ingalls Wilder's books where she describes in great detail the foods, the smells, and the feelings of the food. From the times the family nearly starved all the way to the richer times, Laura's life revolved around family and food.

I just like this book. I keep wanting to try some of the recipes from it. I am thinking the pickled beets would be great since I have a garden full of beets. I will work on that in the next while.

In the meantime, I am still making ginger syrup but have also started making lemon syrup for lemonade...oh and am I in love with lemon syrup...(especially with a shot of rum or gin or vodka in it....)


With many thanks to Pinterest for helping me find this one. The recipe actually hails from the Anne of Green Gables Cookbook (perhaps another one I should pick up...) but I found it on the Simply So Good Blog.  Perhaps I was drawn to this recipe over others due to its traditional roots.

It really is simple:

1 1/2 cups sugar
1 1/2 cups water
1 1/2 cups lemon juice (fresh squeezed please)
zest from one lemon

Boil the sugar and water for about 5 minutes. Add the zest and lemon juice and allow to cool.  Transfer to a jar or other suitable storage vessel.

This works well using 1/3 cup syrup to 1 can of club soda or the equivalent amount of cold water. (Don't forget that shot of rum).

Adding some frozen fruit is fabulous as well...I like frozen blueberries but fresh strawberries muddled in the bottom....raspberries....blackberries....you get the idea!

Frozen blueberries

Fresh strawberries
We also got a fabulous haul from our CSA this week....


Check out other fabulous recipes at the Melt in Your Mouth Mondays Link up!

Until next time, stay warm keep cool and eat well.

Thursday, July 19, 2012

The Zucchini Season Begins: Zucchini Fritters


Our CSA pick up from Almost Urban Farms netted us some extra zucchini along with our other goodies this week. There was a bin filled with extras and a note inviting people to take an extra one. I know some of this extra zucchini will become a fabulous chocolate cake but I can only make (and eat) so much cake.  Last night with dinner, I made some zucchini fritters to go with the sliced roast beef I pulled out of the freezer. The fritters themselves are more like a potato pancake, without the potato. I have made these with grated potato before and they tasted wonderful but last night, I wanted to try these with all zucchini. The Boy has been eating the leftovers all day. (Because 16 year old boys eat pretty much all day)


Zucchini Fritters - printable recipe

4 cups zucchini, grated (I used half yellow, half green)
1 onion, grated
2 cloves garlic, grated on a micro plane, or crushed
2 green onions, chopped
handful of parsley, chopped
1/2 cup flour
1 egg
salt & pepper
Canola oil for frying

Heat up a large skillet over medium high heat with a small amount of canola oil in the bottom. This is a good time to line a baking sheet with foil, place a rack in the pan and plunk it in the oven. Set the oven to warm. This will help you fry all the fritters in batches and keep them warm.

Grate the zucchini, onion, and garlic into a large bowl and mix in the green onions, parsley, flour, salt & pepper and the egg.

Mix well to combine everything. It will look gummy and pasty, but will fry up a nice golden brown.

Once the oil is nice and hot (a drop of water will skip across) drop the batter by large spoonfuls and gently flatten them out.

Fry the fritters until golden brown on the edges and they start to dry out a bit on top then gently flip them over to finish cooking. (Be gentle so you don't splash the oil)

Transfer gold brown fritters to your pan in the oven to keep warm until the entire batch is cooked.


Last night these little gems were served up with hot roast beef sammies. Thank goodness for leftovers in the freezeer!!

Until next time, stay warm and eat well!

Our fabulous bounty this week!

Wednesday, July 11, 2012

There's Kale With My Bacon


Yesterday was CSA pick up day which netted us a lot of the same types of things as last week. We've had a busy week so I failed to take photos of our haul before I prepped it for the fridge. (Sorry about that.) I did however get excited because we got more edible flowers this week!!

People warned us when they learned we had signed up for a Community Supported Agriculture program, telling us that we'd get nothing but kale. We have actually only received 2 small bunches of the curly green stuff. I tried making kale chips with our small bunch of kale last week but I did not like them. Perhaps I need to try again and bake them a bit shorter? The Boy and I both like raw kale though. We even made ourselves some BKT sammies for lunch today and the kale worked so well with the sammie!


Our busy week actually started this past weekend with the Boy and his baseball playoffs. They managed to win all 4 games in the tournament and will play for the City championship tonight. (go team!) Sunday we had some people come on over so they could tear out yucky old garage down, knock the crumbly front steps off the house, take out some tree stumps, and tear out the old fence...I am sooooo glad someone else did the work.
Goodbye old garage...glad the garden made it safe and sound!
So long crumbly and dangerous steps!

Did I mention the water main break that caused me to be without water for a short while?


Now, we have a whole bunch of shirtless men working in the yard....life is sooooo darn tough sometimes.  A new fence is going up as are new stairs on the front of the house. I actually can't believe these guys just keep working in this heat. I almost feel bad sitting here inside blogging....almost.

Work is progressing nicely and I am excited about a new fence and a chance to get my yard done up the way I want it....once I decide what that is, it will be fun. I promise...

Until next time, stay warm stay cool and eat well.

Wednesday, July 4, 2012

CSA Update: Our Farm Share

How's the heat treating you? I'm never going to complain about the heat because we get sooo much cold, this is glorious!! We've been busy here in the Little Kitchen.  The Boy had 4 wisdom teeth removed and is on the mend. A few giant pots of home made mac 'n cheese helped, so did the T3s....

Yesterday We got our 3rd week of goodies from the CSA program and we are knee deep in leafy greens! One of the things people said to us we we started talking about joining a CSA was "I hope you like kale".  We actually got a little bit of kale for the first time in this box but have been enjoying the gorgeous salads we've been able to make with the greens we've been getting.

This time we got some pea shoots!


Beets and salad turnips.


Lots of greens!

A couple of cucumbers, a few baby squash, garlic scapes, and peas.


The first peas of the season!!
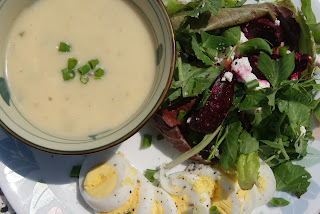
 Today for lunch, I had a tasty salad with roasted beets, goat cheese, and hard boiled egg along with a bowl of Perogy soup from Frozen Comfort.

 Again, I used no dressing. The goat cheese and some salt and pepper was all that it needed! (Oh, I think some walnuts would go perfectly here too....I will add walnuts to the list!)

It was a perfect lunch, especially since I am planning on going to the ball park later to annoy the Boy at work!!! (Mmmmmm, ballpark goodies!!!)


Until next time, stay warm and eat well.

Saturday, June 30, 2012

A Simply Pretty Salad

This week in our CSA pick up we got some more lovely greens 'n things so tonight we made one of the prettiest salads ever with some of the contents.

Roasted beets, goat cheese, greens, flowers, tomatoes, and a few bean sprouts....


It didn't need any dressing.


It was just that tasty and lovely.


It was the perfect meal before family movie night!


Until next time, stay warm and eat well.