Showing posts with label lunch. Show all posts

Wednesday, August 15, 2012

Delectable Eggplant Sammies

Our yard renos are coming along somewhat slowly (It's my yard so there's no rush). We have been working on fixing it up, starting with a new fence and removing some trees that were in the way and coming up with ideas to make it a space we can really relax in. Today's plan to raise the sinking shed were put on hold due to rain. This of course allowed us time to clean up inside. (There's always something to do!) Aside from a nap and a trip to the store, I used some of our lovely bounty from the farm to make us a late lunch.

We keep getting such wonderful fresh veggies from our CSA at Almost Urban Farms and this is keeping me busy with cooking ideas. As the summer flys by, we get more and more yummy items in our baskets. This week we got this absolutely gorgeous (and gigantic) eggplant. We got an eggplant last week and I tried grilling it up along with the summer squash and let me tell you, it did not turn out as planned. Grilled zucchini and summer squash are always delish, but the eggplant turned out tough, chewy, and gross...ew...almost made me not want to eggplant ever again.

This week I knew it would wind up breaded, fried, and loving placed between 2 pieces of bread....and you know what? That is exactly what happened!


You will need:

1 eggplant
1 cup flour
3 eggs
2 cups panko bread crumbs
1/2 cup grated Parmesan cheese
1 tsp garlic powder
salt and pepper
1 clove garlic
fresh herbs (today I used rosemary, sage, oregano)
canola oil (enough to shallow fry)
provolone cheese, sliced (or any other good melting cheese)
marinara sauce (or your favourite tomato sauce)
Bread. Choose a good sturdy bread. I found a gorgeous loaf of Italian bread but the sour dough looked good too.

Wash and slice the eggplant into thick slices, sprinkle with salt and lay in a colander to drain.


Line a baking sheet with foil and place a rack on the sheet. Place this contraption in the oven and set the oven for 225 or 250 F, This will keep the cooked eggplant warm and crispy while waiting for the others to cook.

Pre heat a large fry pan and add a good amount of canola oil to the pan.  When the oil is hot, add a clove of garlic and a couple sprigs of rosemary, sage, and oregano. (Remove the herbs from the oil as they get crispy so they don't burn. I kept adding more herbs as I went and this really added a nice flavour to the the finished eggplant)

This is also a good time to heat up your marinara sauce in a small pot on the stove.


While the pan is heating up, you can set up a breading station: Place 1 cup of flour on a plate and mix in a good pinch of salt and a grinding of pepper. In a bowl, break and scramble up the 3 eggs. Finally, in a large bowl mix together the panko, Parmesan, garlic powder and another healthy grinding of pepper.

Review time:
  • baking sheet contraption in the warm oven
  • marinara sauce warming up
  • oil heating up
  • eggplant sliced, salted, and draining
  • breading station ready to go
Now it is time to bread the eggplant and fry to a crispy golden brown!!

Pat the eggplant slices dry with a paper towel (or clean tea towel).

Coat each slice in flour and shake the excess flour and plunk it into the egg wash, make sure it is thoroughly coated and allow the excess to drip off.


Coat the egg coated slice into the panko mixture. You may need to lightly press on the crumbs to help them stick. (Don't forget the edges!)


Carefully place a slice of eggplant in the hot oil and fry until golden brown. Gently flip the slice over and continue to fry. When the slices are all golden brown and yummy, transfer to the baking sheet/rack contraption you have in the oven to keep warm. (I have found that without the rack, the underside of the eggplant will get damp and uncrsipy...so don't skip the rack)


Once you have everything all fried and golden, get the bread sliced, the cheese ready and start assembling your sammie!

Check out the rack on a foil lined baking sheet....
I layered my sammie like this: Bread, sauce, eggplant, cheese, (tossed some kale on too), bread. I only used one slice of eggplant but I should have used 2 (and more sauce)!


If you don't want to fry the eggplant, you can spray it with oil or nonstick spray and bake it in the oven. You won't get the same crispness, but it will bake up nicely.

Until next time, stay warm and eat well.

Friday, July 13, 2012

Late Breakfast or Early Lunch?

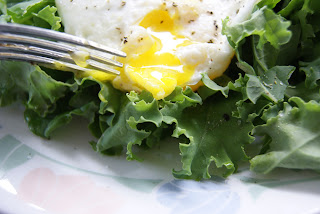
Breakfast this morning Lunch this afternoon was another super simple meal. (It is my summer vacay so sometimes brekkie happens at lunch...) I cooked 2 eggs over easy and served them on a bed of farm fresh kale and a side of multi grain rye toast.  It was simple, easy, and didn't heat the kitchen up.

I must admit that I have never really tried kale. It is always used as decoration and I never really thought about eating it.  We tried making the kale chips last week, but no one liked them. As a matter of fact, it almost deterred us from trying the kale again. A friend mentioned using a dehydrator instead so I will have to look into that. I think next time it needs a side of fruit but I did enjoy the kale on it's own with the runny egg yolks.


Until next time, stay warm cool and eat well.

Wednesday, July 4, 2012

CSA Update: Our Farm Share

How's the heat treating you? I'm never going to complain about the heat because we get sooo much cold, this is glorious!! We've been busy here in the Little Kitchen.  The Boy had 4 wisdom teeth removed and is on the mend. A few giant pots of home made mac 'n cheese helped, so did the T3s....

Yesterday We got our 3rd week of goodies from the CSA program and we are knee deep in leafy greens! One of the things people said to us we we started talking about joining a CSA was "I hope you like kale".  We actually got a little bit of kale for the first time in this box but have been enjoying the gorgeous salads we've been able to make with the greens we've been getting.

This time we got some pea shoots!


Beets and salad turnips.


Lots of greens!

A couple of cucumbers, a few baby squash, garlic scapes, and peas.


The first peas of the season!!
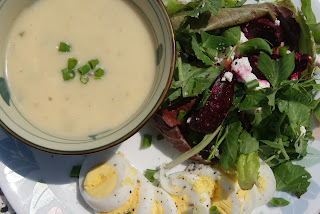
 Today for lunch, I had a tasty salad with roasted beets, goat cheese, and hard boiled egg along with a bowl of Perogy soup from Frozen Comfort.

 Again, I used no dressing. The goat cheese and some salt and pepper was all that it needed! (Oh, I think some walnuts would go perfectly here too....I will add walnuts to the list!)

It was a perfect lunch, especially since I am planning on going to the ball park later to annoy the Boy at work!!! (Mmmmmm, ballpark goodies!!!)


Until next time, stay warm and eat well.

Monday, June 11, 2012

Mason Jar Salad: Day 1 (And Banana Muffins)

Today's jar salad was fantastic! (It was also the talk of the staff room for both Hubby and I.)  I managed to leave enough room for a good shake an successfully mixed it all up! The lemon vinaigrette was perfect.  The beets managed to colour everything a nice shade of purple too! Of course today was day one. Hubby has a couple more salads in the fridge for his week but I am leaving for 2 days of camp with the grade 8s tomorrow so I didn't make more. I am however tempted to make a couple to take and store in the camp fridge. (I'm not sure if I can handle mass produced camp Cesar salad...)


In keeping with my experimenting theme, I decided to make some banana muffins to take with me to camp. That wasn't the experiment. The experiment was switching out the white sugar for maple syrup! I researched a bit online and decided to use 1 cup of maple syrup in exchange for 1 1/4 cups white sugar. I also added an extra 1/4 tsp baking soda and another 1/3 cup flour. Oh, I also only used 2 tbsp of canola oil instead of 1/3 of a cup and I have a sneaky suspicion that I may be able to omit the oil altogether!

Here's the recipe....and FYI, I'm not sure these guys will actually make it out of the house and to camp...they are just that tasty!


Maple Syrup Banana Muffins - printable recipe here

2 Tbsp canola oil
1 cup maple syrup
2 eggs
5 over ripe bananas
2 1/3 cups flour
2 1/4 tsp baking soda
1 tsp salt (or less if you prefer)
1 cup chocolate chips

Pre heat oven to 325

Whisk together the oil, maple syrup, and the eggs until the eggs are thoroughly mixed in.
Mash the bananas, add them to the liquids and mix it all up.
Add on top, but don't mix yet the flour, baking soda, and salt. Use a fork to quickly stir the dry ingredients before mixing them into the wet....this just saves dirtying another bowl!
Mix the dry and wet ingredients together until almost combined, add the chocolate chips and finish stirring until just combined.

Scoop into lined muffin tins (This made 24 muffins) and bake for 20 to 25 minutes...these ones took 25 minutes but always check at the earliest time.

Try to allow these little gems to cool first but try one if you must. (Remember, they are tasty warm but the flavours will have time to meld and these will taste even better the next day!)

Not too shabby!

Wish me luck at camp!

Until next time, stay warm and eat well!

Sunday, June 10, 2012

Your Salad is a Jar

What is with all these jars??
 I have another confession. I have become addicted to Pinterest. It is such a quick way to share and browse ideas and let me tell you, I have found some very neat things on Pinterest and these include ideas for the garden, the kitchen, and even ideas for work. One of these neat ideas, Hubby and I put together tonight for lunches this week! There have been some pins about using mason jars to layers salad ingredients for a quick and tasty lunch. Once assembled, the jars of salads are supposed to keep all week so you can make one for each day on Sunday, then all you have to do is grab a jar, some fruit and yogurt to go with it and you are set! We are trying this out for the week, even though I am going to camp with the grade 8s, Hubby will test the jar theory out for the week.

Wash out your jars so they are ready to go!

We splurged and bought new jars for this one!
 Once you get everything organized, washed, and chopped assembly goes fairly quickly.


We made both a lemon vinaigrette and a balsamic vinaigrette so we didn't have the same dressing the entire week.
Hubby seems to be having fun making his salads!
 After putting a couple tablespoons of vinaigrette in the bottom of the jar it is time to let the layering begin!!

 It is important to put the heavier/more sturdy items in the bottom of the jar so the dressing won't wilt the more fragile items.
 Keep the layers coming!

  Wrap an elastic band around the jar and tuck a fork underneath it (even a napkin!).


Store in the fridge for your grab 'n go lunches!! Remember to leave room so you can shake your salad up at lunch time.


Other things I've been up to (and may or may not have been found on Pinterest):

Growing celery from the end of the stalks.

Once the leaves are up, plant the entire bottom into the soil!
Freezing chicken with marinade in the sealer bag so it can flavour up while it thaws! (I also did this with a large pork loin which I was able to cut into 12 generous chops and 2 fair sizes loin roasts!) We are getting the freezer filled!
This is a ginger honey lime mixture....kind of looking forward to it!
I will get back to you and let you know how the mason jar salad experiment turned out.

Until next time, stay warm and eat well!

Monday, October 4, 2010

Mo pizza you say?

Let's face it, kids (and adults) love pizza.  Especially if it is in a convenient pocket style crust!  I am not a fan of the high salt, high fat, and low flavour store bought varieties.  That cute little dough man should be ashamed of himself!!


I have made these twice now and they are perfect to pack in school lunches.  When I ran out of pizza filling, I used ham and cheese.  There is no end to the possibities when it comes to fillings.  Whatever your family likes!!  When I make these, I like to do a big batch for the freezer so I have doubled the dough recipe. With this doubled dough recipe, you can make 32 tasty packets of yumminess.  I have adapted the basic dough recipe from Mitch's basic dough recipe to accomodate my stand mixer. There is no need to double the filling recipe as it makes lots, but if you do run out, fill the pops with whatever you have on hand! 
This is a multi step process but the results are well worth it and store well in the freezer.


Home made calzone goodness

For the filling:
  • 1 tbsp olive oil
  • 1 tbsp butter
        heat butter and oil in the pan and add:
  • 1 lb cremini mushrooms, chopped
  • 1 large onion, chopped
  • 1 green pepper, chopped
         saute until the water has evaporated  season with salt and pepper and add:
  • 1 500gram stick (log??) of pepperoni, chopped
  • 1 can tomato paste
  • 1 can water (or enough to thin paste to desired consistency)
  • 1 tbsp light brown sugar
  • 1 1/2 tsp Italian seasoning
  • 1 tsp oregano
  • hot pepper flakes to taste


    Allow filling to cool while dough rises.
    For a double batch of pizza dough:

    In the bowl of a stand mixer (or a large bowl if using a hand mixer), mix together
    • 2 cups warm water
    • 4 tbsps yeast (you can use less if  you would like but using this much yeast gives a great flavour)
    • 4 tbsps honey
    • 1/2 cup olive oil
    While the yeast is getting its foam on:

    In a bowl, combine:
    • 7 cups flour (in the last batch I switched half of the flour for whole wheat)
    • 1 tsp salt
    Add the flour to the mixing bowl 1 cup at a time and knead with the dough hook on low.  Keep an eye on the dough as it mixes.  If it is too sticky, add more flour 1 tbsp at a time.  If the dough is too dry, add water 1 tbsp at a time.  Knead the dough for about 5 to 10 minutes.

    Place dough in an oiled bowl, cover with a tea towel and allow to rise for about an hour.
    Punch the dough down and divide into 32 pieces.
    Glorious dough, ready to go!

    ***If you really want to be nerdy like I am, measure out approximately 50 grams of dough per pizza pop!

    Be careful with the dough balls, they will rise again and stick together!

    Say cheese!
    I have used shredded cheese in the past but tonight I found it easier to cut the mozzarella into slices and use a couple of those in each calzone.
    • Mozzarella, shredded
    • Provolone, thinly sliced 
    • add some parmesean!
    Assemble the pops!!
    Measure out approximately 50 g of dough

    Roll a ball of dough into a circular shape
     
    Add 2 scoops of filling
    Top with cheese

    Press edges together to seal.
    Crimp the edges to keep the seal closed.

    Press down with the left finger whil pushing up with the right finger.
    • Bake at 400 degrees F. for about 20 minutes or until golden brown.
    If you are freezing these, place cooled pops in a single layer on a cookie sheet and freeze.  Once frozen, transfer to zip top freezer bags and watch the kids make their own lunches!