Showing posts with label eggs. Show all posts

Friday, July 13, 2012

Late Breakfast or Early Lunch?

Breakfast this morning Lunch this afternoon was another super simple meal. (It is my summer vacay so sometimes brekkie happens at lunch...) I cooked 2 eggs over easy and served them on a bed of farm fresh kale and a side of multi grain rye toast.  It was simple, easy, and didn't heat the kitchen up.

I must admit that I have never really tried kale. It is always used as decoration and I never really thought about eating it.  We tried making the kale chips last week, but no one liked them. As a matter of fact, it almost deterred us from trying the kale again. A friend mentioned using a dehydrator instead so I will have to look into that. I think next time it needs a side of fruit but I did enjoy the kale on it's own with the runny egg yolks.


Until next time, stay warm cool and eat well.

Thursday, November 3, 2011

Diving Into Darkness and an Upside Down Plum Cake

I just can't wait for daylight savings time!! It is soooooooo dark in the mornings it feels like the alarm is going off in the middle of the night! Walking to work in the dark is also kind of scary......just sayin'. Perhaps I should take a flashlight.... At least I get home while it is still light out.  As we delve deeper into autumn then into the depths of winter, it will be dark at the beginning and the end of the work day. OK, enough about the impending darkness on the prairies, we are after all, here for the food!


The other week we bought a bunch of these cute Italian plums.  Hubby loves plums and he figured he'd take them in his lunches to work.  The very first day, I got a message from him that read.  "These plums are tasty".  Followed very quickly by "I just found a worm in the plum".  Well, at least it was the whole worm.....right?  Understandably, he was a little gun shy about taking any of the plums after that....  ICK!


Now I just can't let a basket of plums sit there and not be baked into something!  I started searching the Foodbuzz archives for plum recipes and found this delectable looking upside down plum cake from Boulder Locavore.  After checking the cupboards, then running to the store for milk, coming back, starting the baking, it was after 9:00pm. So what did I do? I kept going forcing me to stay up late. Yes, 6:00 am comes quite early but once I started mixing, I just kept going! Did I need the cake for anything? No. But with my Hubby and the Boy both studying for their courses, I needed something to pass the time.  Also, the plums make me think of summer....

I slightly adapted the recipe to suit my baking style but this cake is so fabulous you should go check out Boulder Locavore yourself.  This cake would go well with other fruit if you don't have plums on hand.

Upside down Plum Cake

·         1/2 cup butter, softened (divided into 3tbsp and 5 tbsp portions)
·         ½ cup packed light brown sugar
·         2 tablespoons water
·         3 cups pitted plums
·         1 ¾ cups flour
·         ½ cup ground almonds or almond meal
·         1 cup white sugar
·         1 tablespoon baking powder
·         ¼ teaspoon salt
·         1 cup milk
·         2 eggs
·         1 ½  tsp vanilla
 
         Preheat the oven to 350 degrees.
 
     Wash and cut the plums into wedges.

       Melt 3 tablespoons butter and pour into the bottom of a 9 x 9 pan. (I used my spring form pan and the butter leaked out so play it safe with a regular pan)

       Add to the butter in the pan the brown sugar and water.  Stir to combine and spread the mixture evenly across the bottom of the pan.

  
     Arrange the plums on the bottom of the pan and set aside.


      In a large mixing combine flour, ground almonds, white sugar, baking powder, and salt.
 
     In another bowl, mix together the milk, 5 tbsp of softened butter, eggs, and vanilla.
  
      Add the wet ingredients to the dry and beat until well combined, then beat another minute on medium,

    
      Bake for 45 minutes or until a toothpick inserted in the center comes out clean.   I think know my cake needed another 5 to 10 minutes to bake.
I lost a lot of the brown sugary goodness through the pan....

           Allow it to cool for 5 minutes on a cooling rack (note: do not allow it to sit longer or it may be difficult to remove from the pan).  Run a knife along the sides of the pan and carefully turn onto a serving plate.    Cool about 45 minutes.

 I highly recommend this cake.  It was the perfect thing to have for breakfast this morning!!
Until next time, stay warm and eat well!

Saturday, May 7, 2011

Strawberry Rhubarb Cupcakes

I am the only girl in my house (unless you count the cats but....).  Sometimes being surrounded by the boys, I feel the need to have nice, pretty, girlie things around.  You know, just because it is nice sometimes to have pretty things.  One really girlie thing I have is my lunch bag.  It is a Disney princess lunch bag and it is pink.  Co workers giggle at it, I know they do because the giggles are often followed by "Nice lunch kit, did you steal it from your kids?"  No, it is mine.  The boys both have New York Mets lunch bags but if they leave that one in a locker or at work, they will not take the pink princess lunch kit! Having pretty things really is just a way of establishing ground rules for what belongs to me.  (Although I am sure that when it really comes down to it, they really don't care either way.  I do however appreciate them letting me think that way.)

My friend Trina made some oh so pretty looking strawberry cupcakes the other day, they really had me drooling.  I started looking (by looking I mean Internet search) for strawberry cupcake recipes.  I found so many that it was overwhelming.  What I decided to do was adapt my vanilla cupcake recipe into a strawberry cupcake recipe.  The strawberry meringue butter cream recipe I saw on Annie's Eats. These girl knows her butter creams! She and Trina both used the one from Martha Stewart.  I changed things up a bit. What I did was this, I used my regular Swiss meringue butter cream and added pureed strawberries at the end.....GLORIOUS (insert angels singing here).


I did make another addition to the cupcake recipe.....Rhubarb!! We were wandering around the produce section and low and behold they had beautiful looking stalks of rhubarb so I made strawberry rhubarb cupcakes with strawberry meringue butter cream.....summer in a cupcake!!


Strawberry Rhubarb Cupcakes
Printable recipe

R2 D2 is always close by...
3 cups flour
3 tsp baking powder
1 tsp baking soda
1/2 tsp salt
1 cup butter
1 1/2 cups sugar
4 eggs
4 tsp vanilla
1 1/2 cups buttermilk
2 cups strawberries and rhubarb (chopped fine)
splash lemon juice
1 tbsp sugar
Small dash of pink food colouring (optional)

Pre-heat oven to 350F

Finely chop the rhubarb and the strawberries.  Mix with the splash of lemon juice and 1 tbsp sugar and set aside.

In a bowl mix together 3 cups flour, 3 tsp baking powder, 1 tsp baking soda, 1/2 tsp salt and set aside.

In the bowl of a stand mixer (hand mixer or by hand will work too) cream the 1 cup butter with the 1 1/2 cups sugar until light and thoroughly mixed.


Add the eggs, 1 at a time allowing each one to mix in completely before adding the next one. Mix in the vanilla and the food colouring, if using.


Add the flour mix and the buttermilk, alternating additions starting and ending with the flour.

Mix in the strawberry/rhubarb mixture.


OK, I am going to level with you here.  I added some pink food colouring to the batter with the eggs to make sure I got a pretty pink batter!!

Scoop into lined cupcake pans to 2/3 full and bake for 15 to 20 minutes or until a toothpick inserted in the centre comes out clean.  Cool in pans for 5 minutes then remove to cooling racks to complete cooling.


Strawberry Meringue Butter Cream

5 egg whites
1 cup plus 1 tbsp granulated sugar
1 1/2 to 2 cups butter, room temperature
1 cup strawberry puree (strawberries, splash of lemon juice in a blender until smooth)

In a bowl set over (not in) simmering water whisk together sugar and egg whites until the sugar is dissolved and the temperature reaches 160F.   Remove from heat and start the next step. (I pulled mine off the heat before 160 as my 'finger test' was not gritty indicating the sugar had dissolved.)

Finger test- dip in a finger and rub with thumb...if it feels gritty, keep whisking and heating.

With the whisk attachment, beat the egg whites until thick and glossy and form stiff peaks. This will take about 5 to 8 minutes.

Add in the room temperature butter 1 tbsp at a time until mixed in.  You may find that you want to stop adding butter when you reach the desired consistency.  I noticed right away when the consistency changed and decided to stop adding butter. I used only 1 1/2 cups of butter today.


Mix in the vanilla and the pureed strawberries until well combined.


Swirl onto pretty cupcakes!!

R2 D2 approves of these pretty cupcakes!
I love these liners!! I found them at Williams Sonoma when we were in St. Louis and have been saving them for a pretty cupcake occasion!

Until next time, stay warm and eat well!

Thursday, March 10, 2011

What Ever Shall I Do??

I had quite the dilemma in the Little Kitchen tonight.  You really wouldn't believe it, it was just that shocking!!! While icing some lovely cupcakes and baking cookies for Friday, I found myself with extra cookies AND extra icing!!! After about 2 seconds of hard thinking (I didn't want to hurt myself you know) I decided to put the two together.....Ricotta cookies and Swiss meringue butter cream, together at last!  I won't need to eat for the rest of the week....

Ricotta cookie recipe here

Swiss Meringue Butter cream recipe here

Delectable things I tell you!  Here's to a terrific weekend to everyone.....despite the whole 'spring ahead' thing.  I think I really do need that hour....

You know, the Boy has a 6am practice Sunday morning....up at 5 am.....with the whole 'spring ahead' thing happening....that is just mean, even if it is all for the love of baseball!

Until next time, stay warm and eat well!

Thursday, December 30, 2010

A Field Trip and A Quick Dinner: Pasta Carbonara

Pasta Carbonara
 My sister and I should probably not be let out of the house together without proper supervision, especially when spending money is involved.  We went on a field trip to Costco today!!!!  It is way too easy to grab the things you want rather than the things you need at this place!  We wandered around, put things in the cart, thought about it, removed things from the cart...the same thing we do everytime we go.  I really don't have the room to store large boxes of items or too many extra things but my sister had a great idea and I don't know why we didn't think of it sooner!  We decided to split the cost of the items both families use on a regular basis. For instance I most likely won't go through 5 dozen eggs in a timely fashion but we split the cost and each got 30 eggs for a good price.  Ok, I will probably use up those eggs but I don't have the storage space. I don't do all of my shopping at Costco as they don't carry everything we need but it is a great place to stock up on items and for baking staples.  (Also to buy way too many things you don't need!)


Of course when it comes to field trips with my sister, we always get sidetracked and never get anywhere on time.  When if finally came time to make dinner, I was looking for something quick to make.  I thought of doing one of my favourites, breakfast for dinner, but then low and behold, on the pacakage of bacon (why not use bacon, I did afterall buy 4 packages of it today!), there was a recipe for a carbonara!  SWEET!

Bacon and eggs,Italian Style
(Pasta Carbonara a la Kirkland Signature bacon package)

1 lb bacon
1 lb pasta - tonight I used Soba noodles
3 eggs
1 cup grated parmesean
1/3 cup chopped parsely
1 tsp italian seasonings
pepper, salt to taste.

This is easy and quick!

First, chop and fry bacon until crisp.  While this is getting its crisp on, put a large pot of water on to boil.


Place the bacon aside on paper towels to drain.


Chop some fresh parsely (thankful to have my plant in the front window!) and measure out 1 cup of grated parmesean.


Crack 3 large eggs into bowl and beat away.

Mix the parmesean cheese into the eggs.


As soon as the pasta is cooked, drain and transfer to the bowl with the eggs and parmesean.


Now mix, mix, mix....or toss, toss, toss with your tongs to mix the eggs into the to cook the eggs.  (The hot pasta will cook the eggs enough to make a nice rich sauce!)


Add your parsely and the Italian seasoning and keep tossing.  Also add the bacon at this point, and mix. (Save some bacon for a garnish)


The boys enjoyed the pasta carbonara.  My son thought it was bland but liked the texture of the sauce. A google search netted basically the same recipe but I wonder if some garlic would have helped?
It was tasty.  So tasty.

Sunday, December 12, 2010

Cinnamon Meringues, A Bake Exchange Delight!


It is bake exchange time!!  I have been humming and ha-ing over what to make.  We have our largest bake exchange yet and there are some heavy hitters at this party!  Some of those in attendance at the bake exchange extraordinaire include Mandy from Whipped , Susie from Suze Homemaker, and Trina from Tortes by Trina is our gracious hostess with the mostess!  There is some pressure here to keep up with these amazing ladies!

As a result I have been toying with meringues!  I have attempted peppermint meringes but they haven't held up too well.  I think I have been adding too much peppermint extract and deflating the meringues. (An interesting fail turned success here includes adding cocoa to the sugar, mixing it into the glossy but deflated whites, stirring in some frozen raspberries and freezing to make a peppermint chocolate raspberry semi fredo!)

The whole fam-damily seems to really enoy the cinnamon meringues so I decided to go with those.  I have tried sprinkling coarse sugar on them to make them dazzle and add some pizzazz but the is something quite quaint and eloquant about a piped meringue. Light, crisp, and slightly chewy inside, these melt in your mouth cinnamon meringues are divine!  The original recipe for these can be found here, on the Food Network site.

Make 'em any way you want Meringues!
(so called because once you get the hang of meringues, you can change the flavourings, fold in different add ins and really make it your own) 
  Printable version
4 egg whites (I used the egg whites from a carton, just to make it easier.  I really didn't want to waste all those
                      egg yolks)
1/4 tsp lemon juice (or 1/8 tsp cream of tartar)
2/3 cup sugar
2/3 cup icing sugar
1 tbsp cornstarch

If  you are separating whole eggs, make sure there is absolutely no yolks in the whites.  Any amount of fat, no matter how small will cause an epic fail and the egg whites will not whip up properly.  This goes for any residue on your bowl or whisks.  Wash them in hot soapy water to make sure there are no oils or fats what so ever that will work against you.  I think this is why my peppermint meringues didn't work: there was oil in the extract I was using.

Bring the egg whites to room temperature for about 1/2 an hour.  Room temperature whites will whip up quicker than cold whites.

Meanwhile, back at the lab.....I mean kitchen..

In a bowl, mix together the 2/3 cup of sugar (and the cream of tartar, if using) and set aside.

In a separate bowl, mix together the 2/3 icing sugar and the 1 tbsp cornstarch.  (Cornstartch while not necessary will help the meringues maintain a nice chewy centre.)
Also mix in any spices such as 1 tsp of cinnamon into the icing sugar.  Set this aside.

When the egg whites reach soft peaks and look like this:

At this point, the egg whites will hold a soft peak (mound).  They will look foamy.  The additions of sugar gives the whites their nice glossy finish.

Add the 1/4 tsp lemon juice (if using).  This will act as a stabilizer to help prevent deflation of your heavenly mass of meringueness. If you have cream of tartar, mix it in with the sugar.

Add the sugar, one tablespoon at a time.  This should be a slow process so the sugar has time to dissolve and work its magic.  Adding the sugar will turn the whites from a bubbly mass of fun to a nice glossy mass of sugary  meringue madness.

Add the sugar one tbsp at a time!
 If it looks like this, the whites are not ready to go yet...Just beat it some more!

Keep beating!!
Continue to beat the the holy living you know what out of the whites until it reaches stiff peaks.  Stiff peaks on egg whites should look a little like this:

Now that's a nice peak!

A snowfall of sugary sweetness!


Once you have a lovely mass of glossy, stiff peaks of egg white madness, it is time to sift in the icing sugar mixture!!


Gently fold the icing sugar mixture until it is well incorporated. 


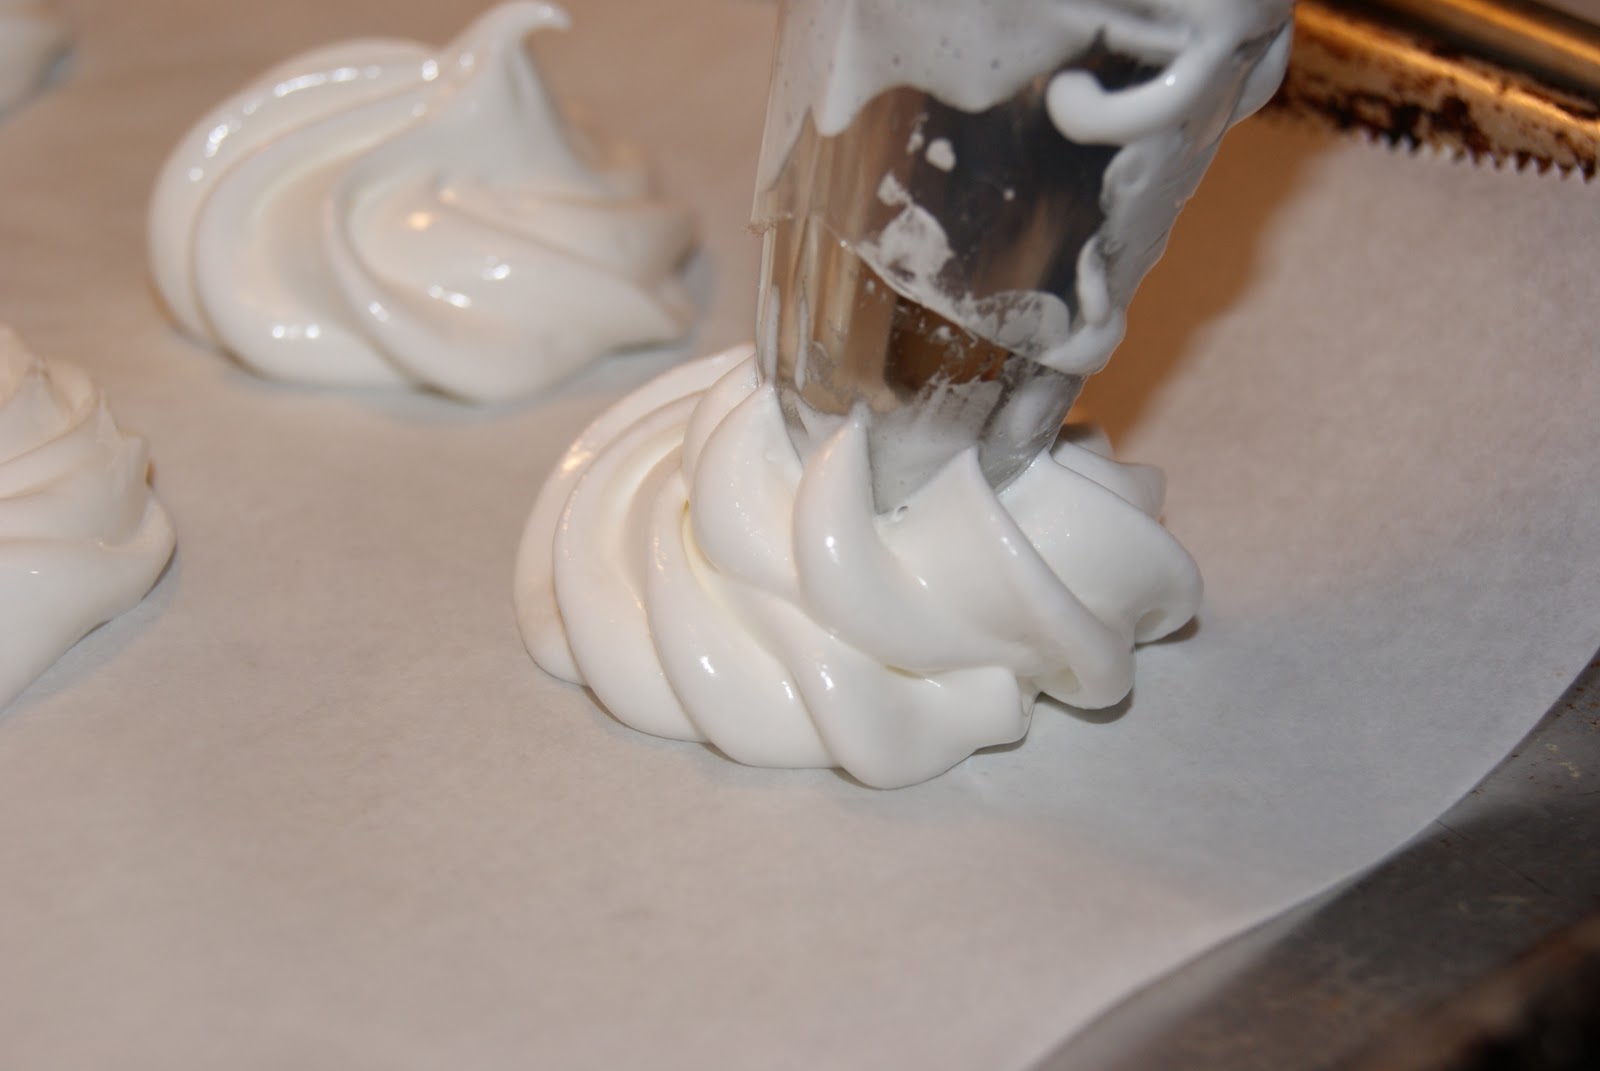
Now is the time to scoop the meringue into a piping bag and start piping!

Start by applying gentle pressure to the bag


 With the tip close to the parchment paper, start by applying a gentle squeeze on the bag.

Now draw a circle with the meringue as you apply pressure.  (the more pressure you squeeze on the bag, the more quickly you will have to draw your circles)


Finish the circle by overlapping slightly and draw into the centre of the circle.


Stop applying pressure to (or squeezing the icing bag) and pull the whole she-bang up.  You can either leave the fancy tip on the meringue or you can use a clean finger to rid of them.  If you leave the sharp points on, they will most likely get knocked off after they are baked.


Bake in a 200 degree F for 1 hour, 15 minutes.  Finished meringues will be light and airy.  They will also be dry to the touch.

Allow the meringues to cool on their sheets.

All packaged up and ready to exchange!