Showing posts with label hungry teens. Show all posts

Monday, January 17, 2011

A Cold Snap, Summer Dreaming, and A Hot Oven Equals Pizza!!!

As I get ready to post this, the tempurtare has plummeted and we 'welcome' our January cold snap!  -36 Celsius and it is still expected to drop!!    We are still in the midst of a nasty January cold snap.  When I woke up it was a chilly -32 Celsius (with the wind chill)....BRRRRR!!  Yesterday was indeed cold and the chili really helped warm me up, especially after venturing out into the cold to go swimming at the pool.  As of this evening things have warmed up slightly, well enough for the snow to start falling...it is only -15 Celsius....but with the wind it feels like -26 Celsius.  Yup! Gotta LOVE winter because it makes you look forward to summer and to things like this:

My favourite summer spot
Summer sunset

The Boy getting in my shot

Instead of dreaming about summer to warm up, another way to help warm things up a bit is to make pizza!!  I have been wanting to make some spinach and ricotta calzones or pizza of some sort.  Tonight is homemade pizza night and this is the perfect time to try this one out!  I used the pizza dough recipe from my Mo Pizza post.  For this particular pizza night, I used 3 cups whole wheat flour and 7 cups white.  Yes, I made the full double batch of dough.  Once the dough is made it can be frozen in single crust servings for use later.  You can even roll out the dough into single serve pizza crusts, layer between parchment paper and freeze for quick pizza dinners! (Attention issues really helps with the multi tasking)

While the pizza dough was rising, I gathered the toppings and set about getting them ready.


Make some pizza sauce by mixing together in a bowl:
  • 1/2 a 28oz can of crushed tomatoes (left over from another recipe)
  • 1 tbsp honey
  • 1 tsp oregano
  • healthy pinch Italian seasoning

Shred the cheeses (yes, there was more than one):
  • Provolone
  • Mozzarella
  • Parmesan
  • Ricotta (well, that didn't need shredding but I took it out of the fridge!)

 Sliced up some other items:
  • Pepperoni
  • Green peppers
  • Onion
  • Mushrooms
  • Tomatoes
Assembled the spinach/ricotta mixture:
  • Thawed and squeezed out 1 10 oz package of frozen, chopped spinach.
  • Mixed in 1 500g container of light ricotta (approximately 1/2 pound)
  • Grated in some nutmeg
  • Tossed in a handful of Parmesan
  • Tossed in a handful of provolone
  • Salt and Pepper to taste

Okay then, now that the dough has had an hour to rise, it is time for some pizza and calzone assembly.

Because I am just that nerdy, I weighed out the dough.  Tonight I went with 3 balls of dough weighing in at 300 grams each and 6 portions of dough weighing 100 grams each.

I find the 100 gram portions perfect for single serve or small pizzas and the 300 gram portions make a nice size pizza for dinner. (I am aiming for leftovers for lunches here but as the Boy is always hungry I will be happy if it lasts throughout the evening!)

First I assembled some spinach/ricotta calzones for lunches by rolling out the 100gram portions and spooning more filling than I think can fit and sealing them all up.  I actually went with 4 calzones so I could test out 2 mini size pizzas.

Just fold in half and seal!
The 2 mini sized pizzas were a perfect base for the rest of the spinach/ricotta mixture, a couple of tomato slices and a bit more cheese!

One mini spinach/ricotta and the calzones

I then rolled out the 300 gram portions.

Sauce it up!
Pepp it up!
The other stuff!
Get cheesey!
Bake it up!
Pile o' pizza for snacks and lunches!!

Gotta love food that is already prepared and ready to eat...especially when it is homemade!  In the meantime, keep warm and eat well!


Ahhh, homemade pizza!  So worth the effort!
Tuesday, December 28, 2010

Ravin' Review: Mongos Grill

After tons of holiday cooking, baking, and eating it was time to let someone else do the work! Our lunch stop today was Mongos Grill. We do go here quite often these days. Mongos is a stir fry place. The veggies, meat, noodles, and sauces are laid out buffet style so you get to fill your bowl and create your own masterpiece. I can honestly say I have never had the same meal twice here!

Big ol' bowl of stir fr

When you go to Mongos, you have a choice of getting the 'one bowl' stir fry, the unlimited bowls stir fry, or the soup, salad bar, and stir fry. We have never done the soup and salad bar here, we always go for the stir fry. Mongos provides 25 various veggies for you to choose from which get replenished often. They also offer 10 different protein choices including tofu for you to choose from. Once you choose all of your veggies, meats, and noodles, you have a huge choice of sauces and seasonings to choose from. Mix and match to your heart's content. The choice of 16 sauces plus other seasonings makes sure you get all the flavour you want.
My 'working the grill' blurry shot....oops
There are many tricks to 'stacking' your bowl so you can maximize your one bowl experience:

Hubby likes to use the frozen sheets of beef to make a wall but today that proved a might difficult. The line up for the grill was long and when the frozen meat thaws, you risk an avalanche of tasty goodness!
Notice the drooping meat at the sides...everything settled. Also note noodles on the counter.
My son swears by using the potato slices for his extended wall. He says it works wonders.

Right here under the meat you can see his potato wall...working quite well today!

Today I went with the snow pea wall....first I use the tongs to pile on the snow peas, then take the time to insert them between the edge of the bowl and the food already in the bowl. This worked quite well. I only wish I had taken the time to do this all around as once the meat on the other side thawed.....I had a bowl breach!
Note the bowl breach on the right...the snow peas worked well tough!

Today was a very busy day at Mongos and the line up for the grill was long. It is neat to watch the staff 'work the grill' and cook so many stir fries at once! The waiting really is the hardest part though.


Once the lovely staff take your bowl for frying, you still get more choices!! They will ask you if you want rice and they will give you a bowl or they will mix it into your stir fry....not just rice though. You can choose from white, brown, or fried rice! You can also have an egg added to the mix if you would like. They even crack the egg and cook it along with your food! After the cooking is done, you can even have your stir fry wrapped up in a tortilla or a flavoured wrap if you'd like!
Hubby's stir fry with an egg cooking and rice waiting to be added!

Even though Mongos offers seafood and gluten items, they are very accomadating for allergies. Hubby has a fish/seafood allergy and they will clean the grill for him and give his food extra room on the grill. If you are looking for gluten free, they keep a list of their gluten free sauces on the wall as well as a list of their other gluten free items. The Mongos staff also offer to get you veggies and sauces from the back if you are worried about cross contamination with the buffet style of service. You can also find a list of nutritional information on their website.

Despite being super busy, the food was quite good. The waitress was very nice and pleasant but did seem to have trouble keeping up with tables who needed refills on their drinks. The wait (for us) at the grill wasn't all that bad either. It looked like it slowed down quite a bit after we sat down with our cooked food. That is the one thing with Mongos is you will have to wait in line with your full bowl for them to cook it on the grill.

I have heard people complain about the actual food at this place as well as the taste but this all depends on what you choose to put in your bowl. The veggies are fresh, the meat is fozen and sliced thin. I do think they need to send the clean up crew more often for the floor. People tend to overflow their bowls with sauces or hand landslides of noodles and this makes messy, and slippery on the floor. This is also a great place to feed a hungry teen!

And let's not forget my lightsabre chop sticks from home!

Thursday, December 9, 2010

Mom?? Is There Anything To Eat Around Here?? Tales of A Hungry Teen

Taco Salad, salsa, & chips
 As I putter around the Little Kitchen getting my lunch containers washed and ready for tomorrow's lunch and pondering the much asked question "What should I make for dinner?"   I hear a key rattle in the lockset of the back door...next comes the click of the door handle turnings.  The door opens and in comes the plodding footsteps of my lumbering teen age son.  Sounding like the call of the wild I hear "Hello!?"  After a quick verbal exchange circling around our days, homework, and what's new, the big question he is dying to ask finally surfaces: "Do we have anything to eat around here?  I am starving!"....

Well, it has started again...my 15 year old son came home from school absolutely ravenous!! While this in not completely unusual, he was just that much more hungry than normal.  He exclaimed that he had eaten all of his lunch at school today and was still hungry.  Most days he comes home and has a snack.  No problem here.  Most kids (and adults) require a little snack to get them through to dinner.  However, he will come home, make a chicken ceasar salad or some other fairly decent snack.

We keep already cooked and sliced chicken breast in single serve portions in the freezer so he can just thaw them in the microwave.  While his chicken his thawing, he prepares his salad with already washed, dried, and stored in fridge romaine lettuce, dressing, some cheese, croutons...all the fixings.  Of course he still eats a full dinner with us later.  Even my son seemed confused by how hungry he was today.  I do try to keep the fridge and freezer stocked with items he can quickly assemble and eat.  This is especially helpful when he has a baseball practice or team workout!  Yes, that is correct, I said baseball.  I realize there is a thick blanket of snow on the ground right now but currently his team practices on skill develpment and strengthening indoors. (They will also get to travel far enough South on their spring break to play in the States where it will already be warm enough to play outdoors.)

Big pot O' taco meat
 Here is our new idea for this week of feeding frenzies!
  • Cook up a big batch of taco meat and store it in the fridge.  Add your favourite taco seasonings.  This can also be stored in single serve (1/4 cup or 1/3 cup) portions and frozen for quick heating in the microwave.  Ideas for taco seasonings can be found here.
Taco meat for the week:

In batches, fry up a large family pack of ground beef, transferring cooked meat to a bigger pot.  While the meat is cooking, add some finely diced onions, garlic and green pepper.  (sneak in those veggies if you have to!)

Mix together in a bowl:
  • 2 tbsp dried red pepper, crushed
  • 2 tbsp onion powder
  • 1 tbsp garlic powder
  • 1 tsp cumin
  • ½ tsp  kosher salt
  • 1 ½ tbsp paprika
Start by using about 1 tbsp seasoning per pound of meat.  Taste and adjust seasonings. Add more hot peppers if you wish. 
  •   Cut up favourite toppings for tacos and taco salads (peppers, shredded cheese, onions, tomatoes, pickeled peppers).  Store the toppings in baggies or containers and place them in a basket in the fridge.  Keeping everything in one basket makes it easy to take that basket out, assemble your taco, salad, or other food item.
  • Add a package of taco shells or flour tortillas to the basket.
  •  
  • Store the taco meat next to the basket.
  •  
  • Store a big bunch of pre washed lettuce on top. 
  • Let your teen make a taco, taco salad, or even a danged quesadilla for snack or for lunch.
basket o' toppings with flour tortillas


  The salsa was made with a little help from Epicure.  It is a simple, easy way to make salsa.  I use a can of no salt added diced tomatoes, some diced peppers, diced onions, and the Epicure spice mix....voila!  Tasty salsa to go with taco week.

My son's taco wrap, chips and watermelon

    Sunday, November 7, 2010

    What do You Mean You are STILL Hungry???? Some friendly neighbourhood tips on feeding a hungry teen.

    Keeping enough food in the house to feed a rapidly growing almost 15 year old boy is tough.  Not only can it be expensive but it is a never ending job.  After school snacks are more like a first dinner.  Snacks after baseball practice have turned into just another meal.  I swear he would eat in his sleep if he could. When I tell you that my boy is a big guy, what I mean is that he is tall.  He towers over me.  If I need something from the top shelf, which is waaay out of my reach, I just call my son.   At the tender young age of 14, he is already over 6 feet tall....he doesn't get that from me.


    Between baseball workouts, growth spurts, and his seemingly bottomless stomach, we have been looking for ways to keep him full.  Lucky for us, our son will give anything a try and is not a picky eater.  He loves sandwiches.  Actually, I think that is an understatement....he LOVES sandwiches.  The only problem with sandwiches is that deli meat is not only expensive but it is loaded with nitrates, sodium, and any number of other additives.  Lucky for us, today was grocery shopping day!


    Today while shopping, outside round roasts were on sale.  We snagged a nice size roast for little money, rubbed it up with flavour and slow roasted it in the oven.  We will slice it up with the deli slicer and voila: sandwiches for lunches and snacks.  Of course it does take a little more than a great deal on a roast to feed a ravenous teen ager for a week.

    Since I do enjoy baking and my son enjoys eating the results of my baking, yesterday I had a bakery day in my kitchen.  It really is a perfect match. I made a double batch of honey seeded buns and a double batch of pretzel rolls.  Both of these will help keep the food costs down for the week.  He can make a quick bunwich (or 3), have a piece of fruit and get on with his day.

     Tips for feeding hungry teens:
    • Shop the sales!  Buy a roast or chicken or which ever is on sale and plan the weeks lunches and snacks around that.
    • Cook your sale meat items to your liking and slice.  The kids will be more likely to use it up if it is already sliced and easy to access.  
    • Freeze excessive amounts in 1 or 2 sandwich portions for easy thawing and sandwich making.
    • bake your bread or buns at home, if possible.  If not, keep the freezer stocked with:
      • buns
      • tortillas
      • pitas
      • flatbreads
      • anything to make a sandwich or a wrap
    • keep a basket in the fridge with approved sandwich fixings (helps keep kids away from things you are wanting to use for other meals):
      • mayo
      • mustard
      • cheeses
      • dressings or spreads of choice
      • washed lettuce (also great for salads on the go) I like to buy the giant bag of prewashed lettuce to keep on hand so my son can make a quick cesar salad.
    • keep another basket with pieces of fruit or other pre portioned snack items that are solely for the purpose of snacking and lunches.  Ours tends to include:
      • apples
      • oranges
      • baggies of carrot sticks
      • yogurt cups
      • baggies of other cut fruit (melon, pineapple)
      • baggies of grapes, cherries
    (These baskets are also a great way to get teens to make their own lunches for school.  Just keep them stocked and get input from the kids so you know what to buy)

     
    Peppered Roast Beef

    Pre heat the oven to 250 degrees F. (This temperature can change depending on what type of roast you have purchased.  Some roasts cook up better in a low temperature oven.)

    Today I used an outside round roast.  Take it out of the fridge to come to room temperature while you assemble the rub.

    Make a rub to season the roast.  Today I used:
    • 2 tbsp black pepper (fresh ground)
    • 1 tsp kosher salt
    • 1 tsp garlic powder
    • 1 tsp onion powder
    • 1/4 tsp cayenne pepper (or to taste)
    Rub the pepper mixture all over the roast, don't miss any part of the roast.  This rub will make a nice peppery crust on the outside of the roast.

    Place the roast in a roasting pan, stick in a thermometer, and cover with foil.

    Roast in the oven until medium on your thermometer (or medium rare, if that is how you like it).

    Allow the roast to cool before you slice it.  This not only allows the juices to redistribute but allows the crust to settle on the roast.


    Slice to desired thickness and start making sandwiches!!

    Monday, October 4, 2010

    Mo pizza you say?

    Let's face it, kids (and adults) love pizza.  Especially if it is in a convenient pocket style crust!  I am not a fan of the high salt, high fat, and low flavour store bought varieties.  That cute little dough man should be ashamed of himself!!


    I have made these twice now and they are perfect to pack in school lunches.  When I ran out of pizza filling, I used ham and cheese.  There is no end to the possibities when it comes to fillings.  Whatever your family likes!!  When I make these, I like to do a big batch for the freezer so I have doubled the dough recipe. With this doubled dough recipe, you can make 32 tasty packets of yumminess.  I have adapted the basic dough recipe from Mitch's basic dough recipe to accomodate my stand mixer. There is no need to double the filling recipe as it makes lots, but if you do run out, fill the pops with whatever you have on hand! 
    This is a multi step process but the results are well worth it and store well in the freezer.


    Home made calzone goodness

    For the filling:
    • 1 tbsp olive oil
    • 1 tbsp butter
            heat butter and oil in the pan and add:
    • 1 lb cremini mushrooms, chopped
    • 1 large onion, chopped
    • 1 green pepper, chopped
             saute until the water has evaporated  season with salt and pepper and add:
    • 1 500gram stick (log??) of pepperoni, chopped
    • 1 can tomato paste
    • 1 can water (or enough to thin paste to desired consistency)
    • 1 tbsp light brown sugar
    • 1 1/2 tsp Italian seasoning
    • 1 tsp oregano
    • hot pepper flakes to taste


      Allow filling to cool while dough rises.
      For a double batch of pizza dough:

      In the bowl of a stand mixer (or a large bowl if using a hand mixer), mix together
      • 2 cups warm water
      • 4 tbsps yeast (you can use less if  you would like but using this much yeast gives a great flavour)
      • 4 tbsps honey
      • 1/2 cup olive oil
      While the yeast is getting its foam on:

      In a bowl, combine:
      • 7 cups flour (in the last batch I switched half of the flour for whole wheat)
      • 1 tsp salt
      Add the flour to the mixing bowl 1 cup at a time and knead with the dough hook on low.  Keep an eye on the dough as it mixes.  If it is too sticky, add more flour 1 tbsp at a time.  If the dough is too dry, add water 1 tbsp at a time.  Knead the dough for about 5 to 10 minutes.

      Place dough in an oiled bowl, cover with a tea towel and allow to rise for about an hour.
      Punch the dough down and divide into 32 pieces.
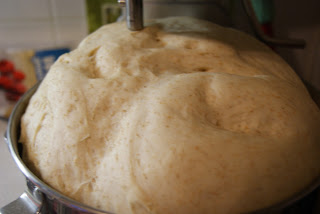
      Glorious dough, ready to go!

      ***If you really want to be nerdy like I am, measure out approximately 50 grams of dough per pizza pop!

      Be careful with the dough balls, they will rise again and stick together!

      Say cheese!
      I have used shredded cheese in the past but tonight I found it easier to cut the mozzarella into slices and use a couple of those in each calzone.
      • Mozzarella, shredded
      • Provolone, thinly sliced 
      • add some parmesean!
      Assemble the pops!!
      Measure out approximately 50 g of dough

      Roll a ball of dough into a circular shape
       
      Add 2 scoops of filling
      Top with cheese

      Press edges together to seal.
      Crimp the edges to keep the seal closed.

      Press down with the left finger whil pushing up with the right finger.
      • Bake at 400 degrees F. for about 20 minutes or until golden brown.
      If you are freezing these, place cooled pops in a single layer on a cookie sheet and freeze.  Once frozen, transfer to zip top freezer bags and watch the kids make their own lunches!