Showing posts with label sandwiches. Show all posts

Wednesday, August 15, 2012

Delectable Eggplant Sammies

Our yard renos are coming along somewhat slowly (It's my yard so there's no rush). We have been working on fixing it up, starting with a new fence and removing some trees that were in the way and coming up with ideas to make it a space we can really relax in. Today's plan to raise the sinking shed were put on hold due to rain. This of course allowed us time to clean up inside. (There's always something to do!) Aside from a nap and a trip to the store, I used some of our lovely bounty from the farm to make us a late lunch.

We keep getting such wonderful fresh veggies from our CSA at Almost Urban Farms and this is keeping me busy with cooking ideas. As the summer flys by, we get more and more yummy items in our baskets. This week we got this absolutely gorgeous (and gigantic) eggplant. We got an eggplant last week and I tried grilling it up along with the summer squash and let me tell you, it did not turn out as planned. Grilled zucchini and summer squash are always delish, but the eggplant turned out tough, chewy, and gross...ew...almost made me not want to eggplant ever again.

This week I knew it would wind up breaded, fried, and loving placed between 2 pieces of bread....and you know what? That is exactly what happened!


You will need:

1 eggplant
1 cup flour
3 eggs
2 cups panko bread crumbs
1/2 cup grated Parmesan cheese
1 tsp garlic powder
salt and pepper
1 clove garlic
fresh herbs (today I used rosemary, sage, oregano)
canola oil (enough to shallow fry)
provolone cheese, sliced (or any other good melting cheese)
marinara sauce (or your favourite tomato sauce)
Bread. Choose a good sturdy bread. I found a gorgeous loaf of Italian bread but the sour dough looked good too.

Wash and slice the eggplant into thick slices, sprinkle with salt and lay in a colander to drain.


Line a baking sheet with foil and place a rack on the sheet. Place this contraption in the oven and set the oven for 225 or 250 F, This will keep the cooked eggplant warm and crispy while waiting for the others to cook.

Pre heat a large fry pan and add a good amount of canola oil to the pan.  When the oil is hot, add a clove of garlic and a couple sprigs of rosemary, sage, and oregano. (Remove the herbs from the oil as they get crispy so they don't burn. I kept adding more herbs as I went and this really added a nice flavour to the the finished eggplant)

This is also a good time to heat up your marinara sauce in a small pot on the stove.


While the pan is heating up, you can set up a breading station: Place 1 cup of flour on a plate and mix in a good pinch of salt and a grinding of pepper. In a bowl, break and scramble up the 3 eggs. Finally, in a large bowl mix together the panko, Parmesan, garlic powder and another healthy grinding of pepper.

Review time:
  • baking sheet contraption in the warm oven
  • marinara sauce warming up
  • oil heating up
  • eggplant sliced, salted, and draining
  • breading station ready to go
Now it is time to bread the eggplant and fry to a crispy golden brown!!

Pat the eggplant slices dry with a paper towel (or clean tea towel).

Coat each slice in flour and shake the excess flour and plunk it into the egg wash, make sure it is thoroughly coated and allow the excess to drip off.


Coat the egg coated slice into the panko mixture. You may need to lightly press on the crumbs to help them stick. (Don't forget the edges!)


Carefully place a slice of eggplant in the hot oil and fry until golden brown. Gently flip the slice over and continue to fry. When the slices are all golden brown and yummy, transfer to the baking sheet/rack contraption you have in the oven to keep warm. (I have found that without the rack, the underside of the eggplant will get damp and uncrsipy...so don't skip the rack)


Once you have everything all fried and golden, get the bread sliced, the cheese ready and start assembling your sammie!

Check out the rack on a foil lined baking sheet....
I layered my sammie like this: Bread, sauce, eggplant, cheese, (tossed some kale on too), bread. I only used one slice of eggplant but I should have used 2 (and more sauce)!


If you don't want to fry the eggplant, you can spray it with oil or nonstick spray and bake it in the oven. You won't get the same crispness, but it will bake up nicely.

Until next time, stay warm and eat well.

Wednesday, July 11, 2012

There's Kale With My Bacon


Yesterday was CSA pick up day which netted us a lot of the same types of things as last week. We've had a busy week so I failed to take photos of our haul before I prepped it for the fridge. (Sorry about that.) I did however get excited because we got more edible flowers this week!!

People warned us when they learned we had signed up for a Community Supported Agriculture program, telling us that we'd get nothing but kale. We have actually only received 2 small bunches of the curly green stuff. I tried making kale chips with our small bunch of kale last week but I did not like them. Perhaps I need to try again and bake them a bit shorter? The Boy and I both like raw kale though. We even made ourselves some BKT sammies for lunch today and the kale worked so well with the sammie!


Our busy week actually started this past weekend with the Boy and his baseball playoffs. They managed to win all 4 games in the tournament and will play for the City championship tonight. (go team!) Sunday we had some people come on over so they could tear out yucky old garage down, knock the crumbly front steps off the house, take out some tree stumps, and tear out the old fence...I am sooooo glad someone else did the work.
Goodbye old garage...glad the garden made it safe and sound!
So long crumbly and dangerous steps!

Did I mention the water main break that caused me to be without water for a short while?


Now, we have a whole bunch of shirtless men working in the yard....life is sooooo darn tough sometimes.  A new fence is going up as are new stairs on the front of the house. I actually can't believe these guys just keep working in this heat. I almost feel bad sitting here inside blogging....almost.

Work is progressing nicely and I am excited about a new fence and a chance to get my yard done up the way I want it....once I decide what that is, it will be fun. I promise...

Until next time, stay warm stay cool and eat well.

Saturday, April 21, 2012

Sandwiches Make Everything Better

We had a tough morning. We drove out to the beloved Little Cabin in the Woods to collect some items to bring home.  You see, my Dad sold his share of the cabin to his brother in law so we are unable to go out there this summer. This was just plain tough for us as we do love that little piece of paradise so much. (We took the canoe to the neighbours so we can still drive out, visit, and go for a canoe ride!) After the drive home, the Boy worked on some homework, hubby had a nap, and I went to the grocery store. To be quite honest, I know we were all feeling a little down.


After some thinking and wondering around, I decided on a menu for a dinner that just might cheer us up.  The plan involved the Boy and I working in the Little Kitchen together and since that is always fun, I figured I'd give it a go!

Rewind to last year when we were in St. Louis,MO on a baseball related trip, we watched a lot of Food Network's Next Food Network Star.  We don't get the American FN shows until about a year after they air in the States but we really liked Jeff Mauro and the fact that he won.  Unfortunately, we had to wait until this year to start getting his show, 'Sandwich King'.  We PVR the show and watch it together and love to see what sandwich he is going to make next. (Long time readers may remember that the Boy is quite the Sandwich hound).

Okay, I know I am rambling on now so to make a long story short, I picked up the ingredients to make Schnitzel Biscuits! The recipe on that link has great instructions so I am not going to re write it but trust me...this is tasty! We followed the recipe for the pork to a T! We even brined the pork tenderloin...don't skip that, it is fabulous!

While the pork was resting in the fridge in its brine, I made my favourite buttermilk biscuit recipe to go with the schnitzel. If you have a go to biscuit recipe, use it. I did make some braised cabbage, but I did not follow Jeff's recipe too closely.  I used already shredded cabbage from a cole slaw mix and halved the recipe. (Also left out the caraway seeds).

I now present to you, Schnitzel prep, in photo form!  After the Boy brined and patted dry pork tenderloin,  he cut it into 8 portions that he then pounded thin...I think that was his favourite part!
Get those frustrations out!!

Put the pork between 2 pieces of plastic wrap and gently pound


We only had to pause once to glue the mallet back together...we will be investing in a nicer one!
The Boy set up his breading station and kept on working!
Ready for the pan!
The Boy seems to have the patience to wait long enough for the perect golden brown!

Let me tell you, the sweet acidity of the braised cabbage really does make the schnitzel biscuit a fantastic sandwich. It cuts through the butteryness of the biscuit and the pork and just makes this sammy oh so delicious!

I couldn't even take the pictures with the Boy trying to gobble up these sammies! I don't blame him one little bit...they were just that fabulous!

Cooking with the Boy this evening really helped cheer us up. Some time together in the kitchen was just what we needed!

Until next time, stay warm and eat well!

Sunday, February 12, 2012

Just Stuff It!! Pretzel Sammies

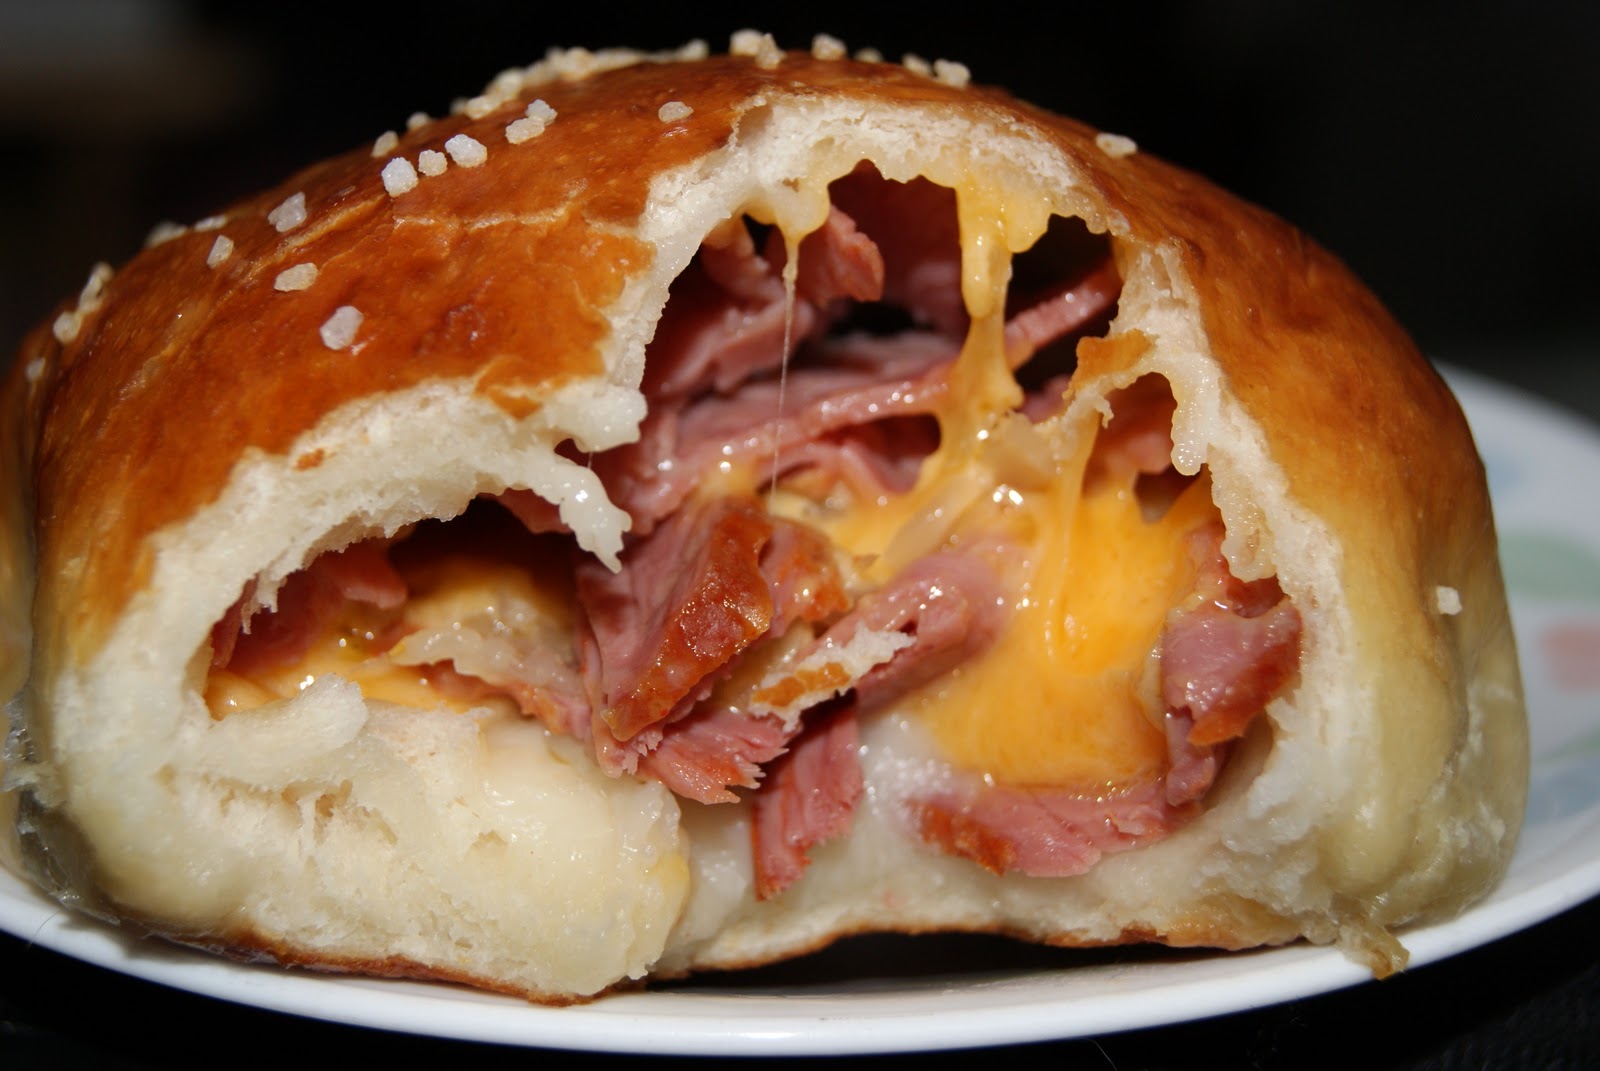
It is Saturday Sunday today! Hooray! I was supposed to vacuum but I haven't done that yet.  What I did do was make some pretzel bites and pretzel sammies.  Spring training is upon us and that has me thinking of pretzels!! I used a good old stand by recipe that I have posted before because it was tasty and lets face it, sometimes it is just relaxing working with a recipe you  know works and works well.  I made the pretzel bite using this recipe here.  It can also be found at this link. For the sammies, I did switch out 2 cups of all purpose flour for whole wheat this time without affecting the texture or the taste.  These sammies were an absolute hit!!
Ham and Havarti pretzel sammies

Pretzel Sammies
For the pretzel dough:
·         2 cups warm water
·         2 tbsp light brown sugar
·         1 pkg active dry yeast (2 ¼ tsp)
·         ½ cup butter, melted
·         3 cups all purpose flour
·         2 cups whole wheat flour
·         3 tsp salt

Hot water bath
·         6 cups water
·         ¼ cup baking soda
Egg wash
·         1 egg
·         1 tsp water

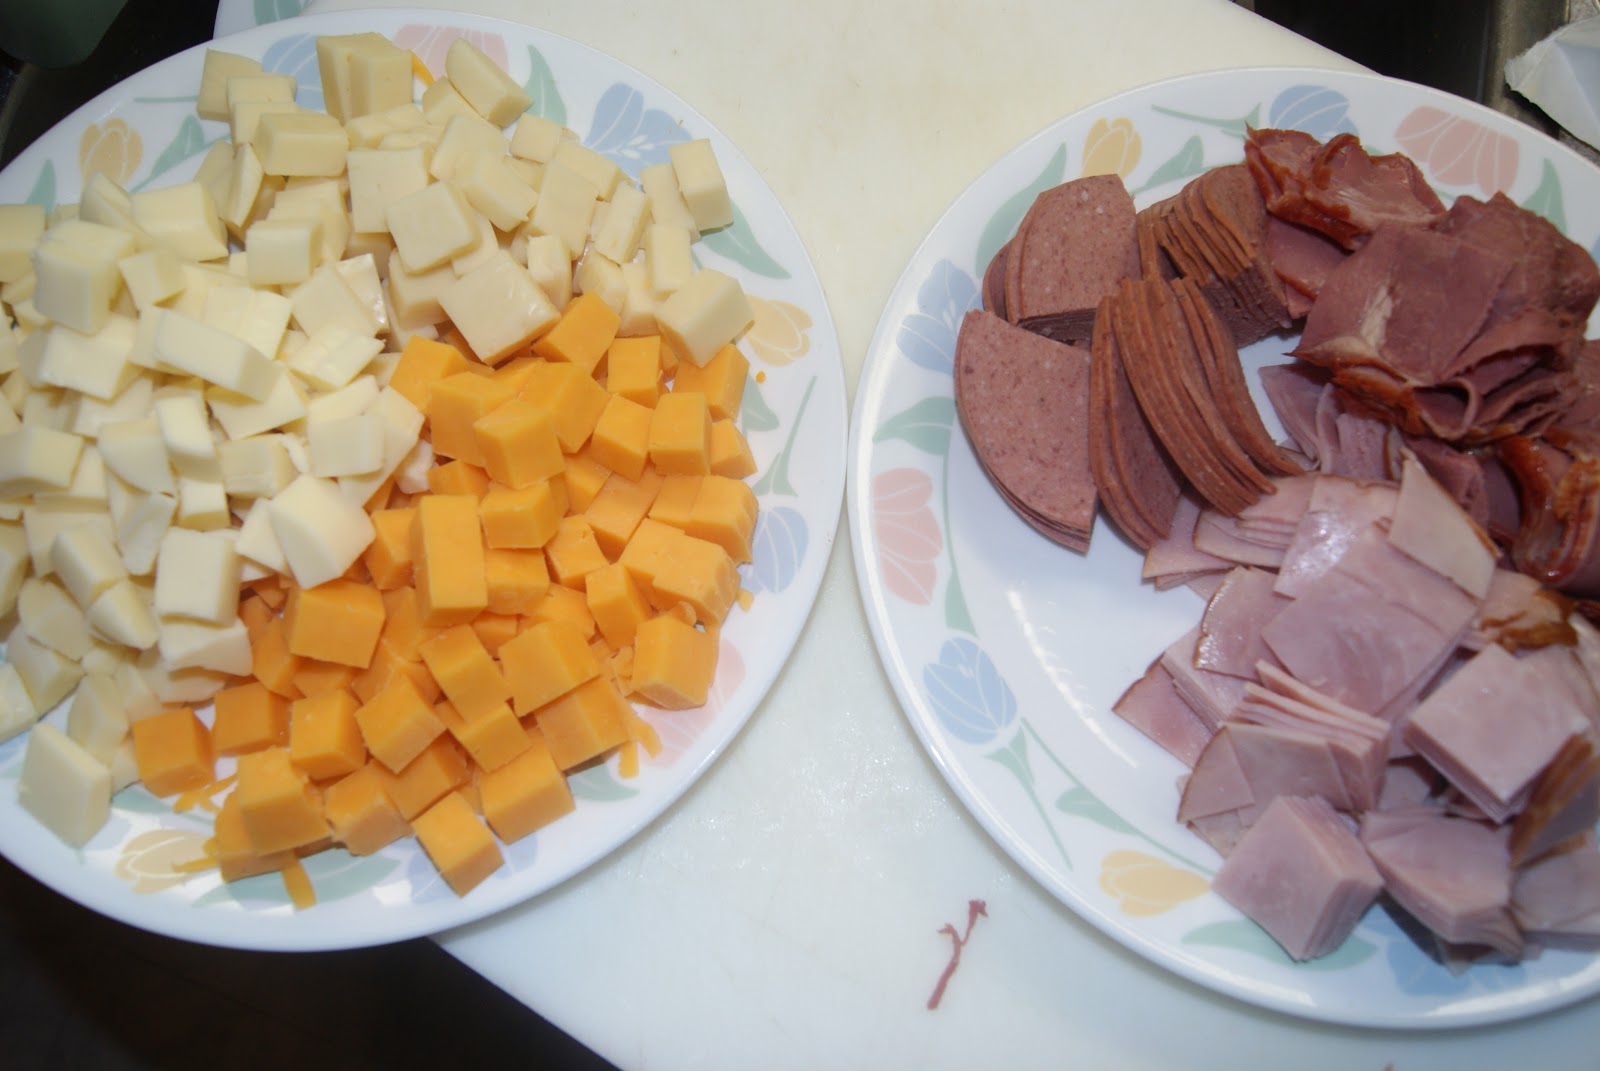
For the fillings, go with your favourite combinations of meats and cheeses.  Today I went with ham and Havarti, salami and provolone, as well as pastrami and cheddar.

Combine the warm water, yeast, and brown sugar.  Set aside for about 5 minutes and let it get all foamy.

Add the melted butter, the flour, and the salt.

With the dough hook, mix everything.  The dough will come together.  If the dough is sticky, add a bit more flour.

Knead the dough for about 5 minutes.

Place the dough in a lightly oiled bowl, cover with a tea towel and set it in a warm spot to rise until double in size, about an hour.

While the dough is rising, cut the cheese into cubes and the meat into more usable portions.

Divide the dough into equal 15 portions. I used a scale and was able to get 15 portions of dough that were roughly 3 oz each.

Form each piece of dough into a ball and cover them with a clean tea towel while you work with a few pieces at a time.

Flatten each dough piece into a flat circle and start piling on the toppings alternating cubes of cheese and pieces of meat.  Pile the fillings on until you think it won’t close.

Pull the dough up around the filling and start pinching to seal all the sandwichy goodness up inside.

Put a large pot of water on the stove to boil.  Once it is boiling, reduce the heat slightly to a high simmer and slowly add ¼ cup of baking soda...it will bubble up so add it slowly!

Simmer the sammies in the hot baking soda water bath for about 1 minute flipping over after 30seconds.  Transfer to a baking sheet, brush with an egg wash.

If you like, sprinkle with coarse salt after the egg wash.  Although if you aren’t eating these right away, then skip the salt as it will just melt away in storage.  If you are making more than 1 kind, use a piece of the meat to lay on top of the sammies to help identify them.

Bake at 425F for about 15 minutes until golden brown.
Until next time, stay warm and eat well!

Thursday, March 24, 2011

On The Road - Day 1

After a long day of driving, we made it to Omaha, Nebraska! We spent pretty much the entire day in the car....really, we did.  Approximately 960km or almost 600 miles. The I 29 just seems to keep going South! Our first stop was in Grand Forks at the Jimmy John's for sandwiches.  We don't have a Jimmy John's back home and when we are on the road we like to stop at the places we don't have at home.


Therefore, our first road meal of the day was sandwiches!  BLTs to be exact!!


We lucked out when we got to the hotel in Omaha tonight there was a Culver's practically in the parking lot! Another restaurant we do not have back home.  I completely forgot the camera in the car but by the time we got to eat, we were pretty darn hungry!  I went with a salad tonight so I could splurge a little and try their deep fried cheese curds....wow! The cheese was tasty, so was the chicken cashew salad.
Back on the road again tomorrow!
 
Until next time, stay warm and eat well!

Wednesday, March 16, 2011

Sandwiches are Beautiful

Tonight's dinner was and simple spaghetti with a spicy mushroom bolognase sauce....sooooo yummy.  I really wasn't planning on posting anything about it.  I didn't take any photos of the process but then the Boy came in from the kitchen with his plate of food.  You may remember me mentioning before about the Boy's love of all things sandwich...he loves sandwiches.

Tonight the Boy made a spaghetti bolognase sandwich!  Oh yes he did....it actually looked really, really good all snug in between two thick cut slices of crusty French bread.


Yup, there it is....the spaghetti sandwich...This kid is so opening a sandwich shop one day....

Saturday, February 26, 2011

Welcome Back Baseball Pretzel Bites

Today is an exciting day in the Little Kitchen! It is the first day ball fans get to watch their beloved New York Mets play a game...of course we are in the comfort of our own living room and the Mets are in sunny Port St. Lucie but thank you to modern technology, we get to watch!!

We all know what this means!!  Pretzel season has officially opened!  I have been waiting so patiently for this.  I do love pretzels! So much that I make pretzel rolls, pretzels, and now pretzel bites and stuffed pretzel sandwiches!!  Have I gone off the deep end??


Perhaps, but that is another post.


Not too long ago, Kate over at Diethood posted her recipe for her pretzel bites.  If you have never clicked your way to her blog, you really should.....I drooled while I read the pretzel bite post, saved it and today was the day to make them!  Pretzels go so well with baseball. They were made for each other

Once I had the dough made and it had its chance to rise, I started rolling out ropes of dough and cutting them into 1 inch (about 2 cm) pieces.  An idea came to me....we all know how much I like to make fold over type of sandwiches so I grabbed the corned beef, cheese, mustard, and sauerkraut from the fridge and made a couple of stuffed pretzel sammies!!

I saved a couple smallish balls of dough and rolled them out.

Cut up some corned beef into smaller pieces and cheese into cubes.

Layer these with mustard or sauerkraut.
If I had some Swiss cheese and thousand island dressing, the sammie on the left would have been a Reuben!

Seal up the dough by pinching it all around the dough.  Make sure the dough is completely sealed.


Simmer in the hot water/baking soda bath, brush with egg wash, sprinkle with salt, and bake until golden brown....that would be about 15 minutes.


Pretzel Bites
·         2 cups warm water
·         2 tbsp light brown sugar
·         1 pkg active dry yeast (2 ¼ tsp)
·         ½ cup butter, melted
·         5 cups all purpose flour
·         3 tsp salt

Hot water bath
·         6 cups water
·         ¼ cup baking soda
Egg wash
·         1 egg
·         1 tsp water
Combine the warm water, yeast, and brown sugar.  Set aside for about 5 minutes and let it get all foamy.

Add the melted butter, the flour, and the salt.

With the dough hook, mix everything.  The dough will come together.  If the dough is sticky, add a bit more flour.

Knead the dough for about 5 minutes.

Place the dough in a lightly oiled bowl, cover with a tea towel and set it in a warm spot to rise until double in size, about an hour.

Put a large pot of water on the stove to boil.  Once it is boiling, reduce the heat slightly to a high simmer and slowly add ¼ cup of baking soda...it will bubble up so add it slowly!

Roll out ropes of dough and cut each rope into sections that are about 1 inch long.

Simmer in the hot baking soda water bath for about 1 minute.  Transfer to a baking sheet, brush with an egg wash, sprinkle with salt.

Bake at 425F for about 15 minutes until golden brown.

 Serve with mustard and cheese sauce for dipping!!!

Until next time, stay warm and eat well!