Saturday, December 25, 2010

A Christmas Day BBQ With Only One Major Glitch

Setting up the BBQ at 4:30ish...yes, already dark outside...

Surely now you must be wondering why on earth we would take it easy on Christmas morning with a lighter breakfast.  (By lighter I mean not much food.  I am sure those cinnamon rolls were anything but light!) We have decided to BBQ for dinner!  BBQ in the snow!  We picked up these gorgeous looking steaks and some ribs!!  Who wouldn't want to save room for that??  Of course BBQing in the winter here requires keeping the BBQ area clear of snow so you can get to the BBQ!  Lucky for us we did that the other day!

Three thick rib steaks....drool.....
The ribs need a little more day before prep to get their flavour on.  The day before they get a massage with a rub mix and time to rest in the fridge.  I used the same rub ratio that I put on my pulled pork.  I must also give credit where credit is due.  This is another Alton Brown recipe!

The day before you plan to cook your ribs, prepare the rub.  In a bowl combine:
  • 6 tbsp light brown sugar, firmly packed
  • 1 tbsp kosher salt
  • 1 tbsp chilli powder (sometimes I use paprika instead)
  • 1 tbsp of any mixture of spices (this is where you can really alter the mixture to suit your taste):
    • for example: 
    • ½ tsp cayenne
    • ½ tsp old bay
    • ½ tsp garlic powder
    • ½ tsp onion powder
    • ½ tsp ground black pepper
    • ½ tsp dried thyme      
    • (as long as you combine 3 tsp of spices, you will get the last 1 in your ratio)
Remove the skin from the back of the ribs.

Coat the ribs with the rub all over making sure to rub all of the tasty goodness into the meat.


Wrap the ribs in tin foil and let them chill in their own tastiness until ready to cook.


The next day:

Preheat the oven to a low temp such as 275F.  Keep the ribs in their foil packets but open up one end and pour about 1/4 cup of liquid in.  I like to use beer but oj, wine, stock, or even water can be used.  Roll the end of the foil back up.
So maybe I used a little more than 1/4 cup...

And some for the cook!
Slow bake the ribs for 2 to 2 1/2 hours.

Remove the ribs from the oven and let them rest.


Slather the ribs with your favourite BBQ sauce and heat up the BBQ!  (Sweet!)
Look at all that BBQ goodness!
 To prepare the steaks, remove them from the fridge to take the chill off for 20 to 30 minutes.  Grind some peppercorns in a grinder so you can use fresh pepper to sprinkle on the steaks.

Rub a healthy amount of pepper and kosher salt onto the steaks.
BBQ on a hot grill until desired doneness.  I am not going to give out times on this one as with the cold weather and the wind chill...it actually took quite a long time to cook the steaks on the grill.  After 45 minutes of getting only one side looking nice, I had to change things up.  I had every intention of cooking completely outdoors but I couldn't get the flame high enough to fight off the cold to cook properly. This made me quite sad as I had to run away to the indoors and a hot broil element in the oven, just isn't the same.  The steaks and ribs still turned out so very tasty.

Our first sign that things were not going as planned was when the propane tank turned out to be empty!  Enough gas to light the grill but not enough to keep it going!  D'oh!  Lucky for us the neighbours left their gate unlocked....also lucky for us these neighbours are good friends of ours and we do borrow things from each other when needed.  Hubby got the new propane tank hooked up and fired everything back up!  That is until the cold took over!  D'oh, again!

I even had to bring the veggies inside!  I wrapped potatoes, sweet potatoes, and carrotts in foil with some butter, salt and pepper and threw them on the grill...again the cold prevails and I moved them to the oven....SIGH.

Peeled, cubed, buttered, salted, and peppered....ready for the grill!
The mushrooms were sauteed inside with butter and garlic!


Creamed spinach also cooked
                                                        indoors.

After all was said and done, the three of us enjoyed a very tasty half BBQ'd meal.  Not as relaxing as originally planned but it all worked out in the end.
I hope everyone has had a stress free, tasty, and a very Merry Christmas.  All the best to you and yours during the holiday season!

Overnight Cinnamon Rolls, Starting New Traditions


Christmas can be a stressful time of year.  So many things to remember, people to visit, shopping to be done, and of course, baking to do. Why do we feel the need to cram so much into such a small amount of time?  We have decided to stay home and relax a little this Christmas.  We will venture out during the day on Christmas eve to visit Hubby's 91 year old grandma but that is probably it.  We tend to see family quite regularly during the year so to really spend a day or two rushing around seems a bit much.  My father and mother in law will come over Christmas morning to visit and have a light breakfast (my dad might stop by as well).  As much as I want to make a full on bacon, eggs,  and hashbrowns brekkie, that would be way too much.  Especially considering we will all be having a big dinner later on.


We used to gather at my Mom and Dad's house every Christmas eve.  They would host a highly attended open house.  Friends and family would come over, eat lots of food, visit, laugh and just be pretty darn merry! Now when I say family and friends, I mean everyone one of us had friends (who are really just like family anyways) from our childhood come over and mingle with the aunts, uncles, and cousins.  As the years went on and families got bigger, so did some of the Christmas eve gatherings.  Most people made the effort to at least come over for a few minutes.  It really was quite the tradition!
The last time we gathered at the house for Christmas Eve (2008) just happened to be our first Christmas without my Mom. We thought we would give it a go since we had so recently lost her but without her there, it just didn't seem right.   Last year we had our first quiet Christmas at home, and you know what? As difficult as it was at first I came to realize that is was nice.  Just the three of us (and the cats).  No rushing out the door, no driving in the new snow, no running all over the city.  When all was said and done, we decided it was a good time start to some new traditions of our own.

A new tradition: baking together on Christmas Eve!
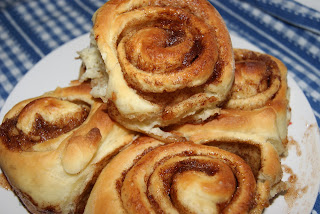
I do love to bake bread.  I love everything about it.  The kneading, waiting for the rise, the shaping of a loaf or buns, and of course, the smell!!!  Now add the aroma of cinnamon to the fresh baking bread.....WOW!!  Cinnamon buns will be served at breakfast Christmas morning!  I made the dough and the rolls Christmas eve with my 5 year old nephew and let it rise in the fridge overnight.  In the morning we will open gifts to the wonderous smell of cninnamon!

My sister and her family came over for Christmas Eve this year and it was quite the nice evening.  We munched on some food, watched "Christmas Vacation", a family favourite, and assembled cinnamon buns.  My 5 year old nephew loves to help in the kitchen so I called over in the afternoon and asked them to bring a baking pan over.  I doubled the dough recipe so Issac and I could make a batch for them to take home and bake in the morning!  I made the dough before they arrived so it would rise.  Five year olds aren't renowned for their patience in waiting for dough to rise.

The boys watching 'Christmas Vacation"
I have made cinnamon buns many times but I don't ever remember which recipe I use.  I think I am still on the hunt for the perfect cinnamon bun recipe...If I had made a cinnamon bun that has blown us all away, surely I would have written it down or saved that recipe somewhere, right?  I am going to attempt Alton Brown's overnight cinnamon rolls for Christmas morning!

Overnight Cinnamon Rolls
Adapted from Alton Brown
Ingredients for the dough
Save the whites for Meringues!

4 large egg yolks
1 large egg
¼ cup sugar
6 tbsp butter, melted
¾ cup buttermilk
20 oz flour (about 4 cups)
1 envelope yeast
1 ¼ tsp kosher salt

Make the dough:

Warm the buttermilk slightly in the microwave and mix in the sugar.  Add the yeast and let it get all nice and foamy.

Mix all of the flour with the 1 ¼ tsp salt.

In the bowl of your mixer and using the whisk attachment, combine the egg yolks, the egg, the cooled but melted butter.

Add in the buttermilk, sugar, and yeast mixture and ½ of the flour.  Whisk until everything is moistened.

Replace the whisk attachment with the dough hook and about half of the left over flour mixture and knead on low for 5 minutes.  Check the dough and add more flour if necessary.  The dough will be soft but shouldn’t be sticky.

Continue kneading on low for another 5 minutes or so.  The dough will pull off from the sides of the bowl.

Lightly oil a big bowl. Transfer the dough to the oiled bowl and cover with a clean tea towel.
Leave the dough in a warm spot to rise until doubled in size.  (Alton says 2 to 2 ½ and that is what it took!)

Make the filling!!!

In a bowl combine and mix thoroughly:

1 cup brown sugar
1 tbsp cinnamon

Set the sugar mixture aside with 2 tbsp softened butter,
Butter a 9 x 13 inch baking dish and set aside.

Punch the dough down!!

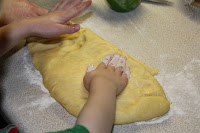
Turn the dough out onto a lightly floured counter.
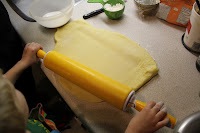


Shape the dough into a rectangle and roll out with a rolling pin, doing your best to keep the shape of the dough rectangular (make it about 18 x 12 inches).


Smear the softened butter all over the dough, leaving a ½ inch border at the top.


Sprinkle the sugar cinnamon mixture all over the butter.


Starting with the long edge closest to you, roll the rectangle up towards the top making sure to keep the roll even and tight.

Pinch the seam gently to seal the roll.
Use a sharp knife, cut the roll in half.  Then cut the halves into half again (making quarters).  Now cut the quarters each into thirds creating 12 even rolls.(I miscalculated and we got 16 rolls....oh well)

Place the rolls into the greased pan cut side down. Cover with tightly with plastic wrap and place in the fridge overnight to chill.

In the morning, remove the rolls from the fridge and let them come to room temperature for about 45 minutes. (Alton suggests placing the rolls in a cold oven on the top rack.  On the bottom rack place a pan and fill it two thirds with boiling water.  Close the oven for about 30 minutes until the rolls have puffed up)

Bake the rolls at 350F for about 30 minutes until a nice golden brown.

Alton serves his rolls with a cream cheese icing but I prefer mine plain with butter or with a simple vanilla glaze.
Mix together 1/2 cup icing sugar with 1 tsp vanilla and enough milk to make a glaze like consistency. Pour over the rolls!

Starting new traditions can be therapeutic.  Making new memories for the young ones to have is truly in the spirit of Christmas.

Tuesday, December 21, 2010

I Can Taste a Difference, Can You Taste a Difference? There is a Difference

Drippy, runny, goey sweetness
 There is an old saying I learned from Saturday morning cartoons, "Now you know. And knowing is half the battle".  I never realized just how true that is.  When it comes to baking there will always be things I need to know or look up.  Always wanting to improve or try something new requires new knowledge and the ability to find the answers.  Another Saturday morning slogan I remember is the "More you know" slogan.  Again, this is so true.  I feel that the more I learn and know about the things I enjoy to do, such as baking, the more I will enjoy to do them.  I like to learn new things all the time.  Tonight was a learning night and I thought I should share my new knowledge because "Knowing is half the battle"!

Tonight while shopping and allowing Superstore to suck all the life out of my evening (save for a batch of ginger cookies) dear Hubby asked a question to which I did not know the answer.  I had to look it up when I got home!!  Sure, I could have posted a question of Chef Dennis in his Ask Chef Dennis section but then I would still be waiting until the answer was posted.  I was really curious and wanted to look this up tonight!
You see, I needed more molasses to finish some baking for the holiday season. As we lollygagged down the baking aisle looking for molasses, (I swear they move it everytime I need to buy it!) dear Hubby finally popped the question:

"What's the difference between cooking molasses, fancy molasses, and blackstrap molasses?  What kind do you need?"

All shopping stopped dead in its tracks!  Umm... Well.....  I, oh,  "Don't ask me questions to which I do not know the answer" came my reply.

Tonight then became a quasi trial night.  I made the ginger cookies with cooking molasses instead of fancy molasses tonight.  There was definitely a different taste to the cookies.  They weren't quite as sweet as the ones I made originally and they were a bit darker in colour as well.  Also there was a slightly bitter molasses after taste that wasn't by any means a bad taste but it would go well with a glass of milk, a cup of tea or coffee, or great with vanilla ice cream.

This week's cookie with cooking molasses:
Darker, slightly bitter, but still tasty


Last week's cookies with fancy molasses:

Lighter, more sweet, and still tasty


Here is some of the info I found thanks to the Crosby Molasses Company:

Fancy Molasses is what is left over after sugar cane has been pressed.  Fancy molasses offers more sweetness and a lighter colour to your baked goods than Blackstrap or Cooking molasses does.

Blackstrap Molasses is what is pressed from the sugar cane after all of the good stuff is gone.  It is darker and has a less sweet taste to it.

Cooking Molasses appears to be a mixture of Fancy and Blackstrap molasses.  It will give your baked goods a darker, slightly bitter taste.  Just as it did with my ginger cookies tonight. (according to what's cooking america)


Wow!  I am glad I looked that up!

Saturday, December 18, 2010

Coconutty Macaroons Really Make my Heart Happy!


I know I keep talking about my favourite cookies but these ones are my absolute favourites and are only made at Christmas...They are decadent, sweet, coconutty....a little bit of chocolate on the top seals the deal!  I first found this particular reciped on the DVD (The video in this link doesn't seem to work in Canada...all of the sites I tried had the video blocked.  This kind of ticks me off.  Oh well I have tried to deliver the source of my tasty treat!).  The DVD came with Alton Brown's book "Good Eats, The Middle Years".  

Little Kitchen confession time....I did receive an oh so yummy batch of macaroons from my friend Susie at last weekend's bake exchange, but those have actually been eaten already!

Here are the ones I made this morning while waiting for the Sugar Cookies to chill in the chill chest.

Macaroons
Original source: Alton Brown
Printable recipe
Preheat oven to 325 F

  • 14 oz sweetened coconut flakes 
  • 1 tsp vanilla 
  • Pinch kosher salt 
  • 2 oz sweetened condensed milk 
  • 4 egg whites 
  • 5 oz (by weight) sugar

In a bowl combine the coconut, vanilla, kosher salt and the sweetened condensed milk.  Mix until completely combined.  Using clean hands for this is very useful in helping to eliminate any lumps or pockets of the sweetened condensed milk.

Weigh out the 5 oz of sugar and set aside.

In the bowl of a stand mixer, beat the 4 egg whites until frothy (as though for a meringue).  Gradually, and by this I mean 1 or 2 tbsp at a time, add the sugar.  Beat until glossy and holds a medium peak.
Fold the beaten meringues into the coconut mixture a little at a time.  Do this in three additions of the fluffy meringues.  
Use a wide and flat utensil to cut through the middle of the coconut, scoop up towards yourself at the edge of the bowl and gently flip or fold  the contents back towards the middle of the bowl.  
 
 
Turn the bowl 1/4 of a turn and repeat until each addition of the meringues are thouroughly folded in.


Using a tablespoon scoop, scoop out macaroons onto a parchment lined baking sheet.


Bake for 20 to 25 minutes.  Finished macaroons will be a nice golden colour on the edges.


Melt 1 pkg (12 oz) of chocolate chips with 1 oz of veggie shortening.  Stir until smooth.
 
Dip the tops of the macroons into the melted chocolate and allow to dry.  (if you can wait that long!)
 
I haven't done the chocolate on these yet but I couldn't wait to share them with everyone!  
I had some extra coconut so I sprinkled it on top!  YUM!
Little Kitchen confession time again!!

I doubled this batch....if you're gong to mess up the kitchen....make it worth your while!  Also make some taste testers!